Welcome to Anne's sewing blog!

I started this blog in 2012 in an attempt to keep better track of all the little things I make. I have found it fun to 'catalog' what I make so I'll continue to post my finished projects as they appear.

Its mostly for my personal use, but also gives me a way to share cute stuff with my craft-oriented friends and family. Enjoy!

Sunday, October 25, 2015

Halloween 2015 - WyldStyle from the Lego Movie

Both my girls were Lego Friends for Halloween last year and Leah decided to stick with Legos and be WyldStyle from the Lego Movie.


The costume itself was super easy.  We bought black pants and a black zip up fleece and embellished them with fleece strips.  Leah designed the graffiti strips herself trying hard to make it exactly match the Lego minifigure.  There are a bunch on the front, a few on the back, then the sleeve, and the hood.


I hand stitched the strips on with matching thread and a big running stitch.  Some of the places (sleeve, etc) were too fiddly to try and fit under the machine and this way the strips will be easily removable later.   I won't lie - it took a good three or four hours to get them all stitched on.


The black sweatshirt we purchased didn't have a hood but Leah had previously crafted a black hood with a pink lining so we just popped that onto this sweatshirt.  


She made a cardboard 'relic detector' so she can pretend to the looking for the 'Piece of Resistance'.  :)


Overall a pretty simple costume and she loves it.  
But, come on, really - 
who wouldn't want to be a cool ninja Lego girl who saves the realm?!  


Halloween 2015 - Batgirl Costume

It's official - the princess years are over.  

We weren't doing the princess thing for Halloween last year either but in the last year any vestiges of princess play have disappeared entirely.  I'm not really sad - we were in that phase long enough.  This year it's all about Legos and DC Comic superheroes.

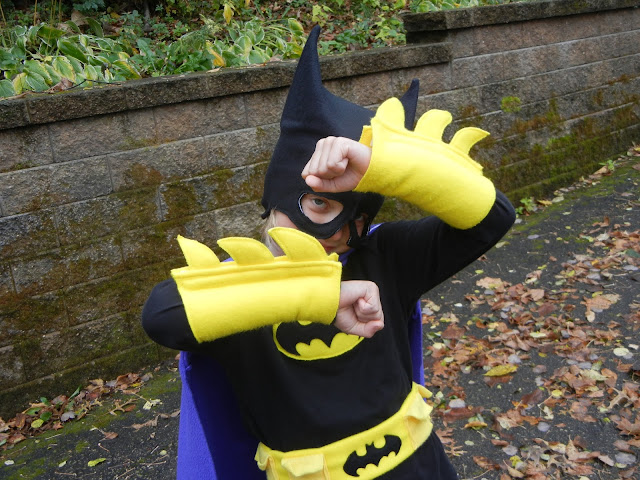
Introducing...  Bat-girl! 


This was a fun costume to make, mostly consisting of fleece accessories and embellishments on store bought clothes.   The base is a black long sleeve t-shirt and black leggings.  

The shirt got a fleece bat symbol.   I'm sure she'll wear the shirt to school on its own once Halloween is over, which is a nice bonus.  


I made a utility belt from fleece.  It closes with velcro in the back and has a bat symbol at the center front with two utility pockets on each side.  The pocket flaps kept sticking up so they are held closed with a velcro dot.  Grace reports the pockets are the perfect size for carrying tissues and hiding pieces of candy.  :)  


The arm cuffs were pretty fun to make.  They are fleece for the most part.  The claws have a layer of stiff interfacing in the middle to make them stand out straight.  The cuffs close with velcro and simply go over the shirt sleeve.  I made the velcro meet 'wrong sides together' rather than overlapping to help those cool flanges stick out from the arm.  


The leg cuffs/fake boots are yellow fleece tubes attached to her leggings.  I shaped the front into a point and attached the cuffs around the top of the yellow.  They hang loosely from that row of stitching - not attached at the ankle so that they can hang nice and cover the top of her shoes.  


The cape I had made over the summer (and apparently forgot to blog about) so that was ready to go.  


The helmet was tricky.  Grace specifically wanted a helmet rather than a mask.  I'm not thrilled with how it turned out but didn't want to spend forever and a day on it either since the other parts of the costume will likely get more wear.  I started with a tube shape that fit her head, tweaked the tube shape to make the bat ears (gluing in a piece of craft foam to make them stick up nicely), then fiddled around for far too long trying to get the eyes and nose to look decent.  I couldn't really get the part around the eyes/nose to fit tighter and closer to her face, but oh well.  Its all soft fleece so its comfortable and it gets the general 'Batman' theme across.   A bit of elastic holds it taut in the back.  We did a trick-or-treat activity yesterday in the windy cold weather and she wore the helmet for two hours straight both trick-or-treating and playing at the park so it must be comfortable enough and it kept her ears nice and warm.  


Here she goes... off to save the world - or at least second grade - from evil villains!  


Friday, October 16, 2015

Cloth Diapering Wet Bags

My last post was at the end of August - about seven weeks ago.  I have sewn SO much in the last seven weeks that it is definitely time to catch up and blog a few things.

Most of my sewing in September was at work in the costume shop.  I made a dress and eight pair of pants for the musical ''Oklahoma!''.  Fun - and a great part time job - but pants aren't really all that exciting to sew.  Especially when you finish sewing them and they are immediately spray painted and scuffed up so that they look old and worn and dirty on stage.  :(  I understand why its done, but its still painful to watch...

On top of the costume shop sewing, I'm working on a quilt and I made myself a dress and Grace a dress for a wedding last weekend.  I don't have pictures of those yet so those projects will have to wait.

So... I'll share the fun things I made this week!  We have a new baby second-cousin on the way in the late half of October and the mom-to-be asked me for a few things.  This is baby number four for them so I told her I'd make her anything she needed/wanted that would be helpful when you already have most of the baby essentials and you're way beyond the 'adorable but useless' phase of parenting.  :)  She wanted extra large receiving blankets and a few 'wet bags' for cloth diapering.  I said, "Yes ma'am, coming right up!"

These are the wet bags.  Aren't they cute?  


I made one small and one large.  
One for pee diapers and one for major blowouts involving clothes. (Wink.)
I'm kidding, I just wasn't sure what size would be most useful so I made two.  

They are made of PUL, a funny fabric designed for cloth diapers that is a bit plasticky and waterproof.   The whole idea of a wet bag is that you put the wet/dirty diapers in it to keep them contained and keep them from leaking all over the rest of your diaper bag/car/stroller/etc.  The bags are self-lined in PUL so I'm hoping two layers will do a good job of containing the mess.  

You start with a pretty standard boxed tote shape - self lined, as I said. 
Then add the hardware to make the closure.  
I used this tutorial (scroll down within the book review post) from my favorite blogger for the general idea.  

Here is what they look like flat.  


To use it, you put your stink inside. 
(I took this picture just to show the lining, but it works for 'putting the stink inside' as well!)


Fold over the top of the bag. 


Fold it again. 


And again.  You're kind of rolling the bag down. 


Then put down your camera so you can use two hands to bring the clips together and close them. 


Ta da!  
Bag all sealed, held closed by the clips, which then also form a handy little handle to either carry it or attach it to something.  I could totally see clipping the stink-filled bag to the outside of your diaper bag/stroller/etc. rather than keeping it inside, couldn't you?!


I hope they work well - they sure are fun and reasonably quick to make!  

Happy Baby Number 4 You-Know-Who!