Welcome to Anne's sewing blog!

I started this blog in 2012 in an attempt to keep better track of all the little things I make. I have found it fun to 'catalog' what I make so I'll continue to post my finished projects as they appear.

Its mostly for my personal use, but also gives me a way to share cute stuff with my craft-oriented friends and family. Enjoy!

Thursday, July 19, 2018

York Pinafore

This must be some sort of record.  The pattern for the York Pinafore was released at the end of May.  Its now the middle of July and I've sewn not one, but TWO pinafores as well as taken photos of them and gotten this post up.  That's warp speed for me!  


For a bit of background, I am a follower of, but not really a participant in, the online sewing community.  I follow a few people through blogs and Instagram and enjoy looking at other people's makes but do not post my makes in an effort to be part of that community or try to keep up with all those super creative and uber prolific sewists.  Plus, I don't consider myself a very trendy person so I usually get around to trying new things just about the time they become out of style and yesterday's news.  ;)  Somehow, however, the stars aligned this summer in that I saw a cute picture of the York Pinafore (this one), I thought it could fill a hole in my wardrobe, and managed to purchase, print, cut, and sew it relatively quickly rather than mulling it over for months or adding it to the miles long list of 'things to try someday'.  And I'm so glad I did!  

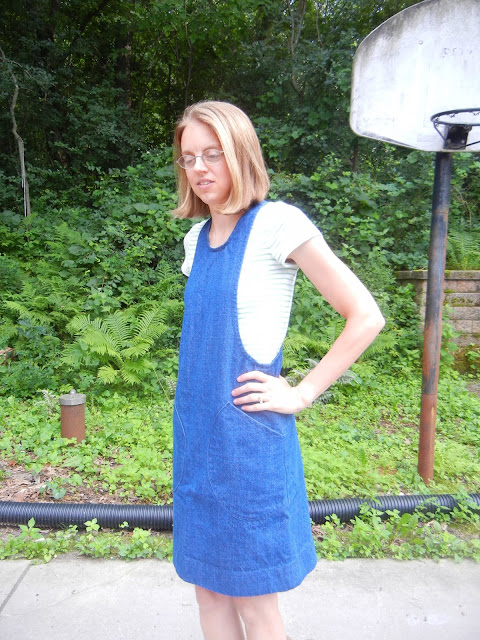
I made a denim one first from some fabric I had in my stash.  I'll call it a wearable muslin... wearable but not perfect.  The denim is a tad heavier than necessary so its on the stiff side, and the sizing is a bit off (more on that later) but its wearable and confirmed for me that I'd like the garment in general.  I know it must be okay on the style radar because my twelve year old kept asking to try it on and borrow it!  


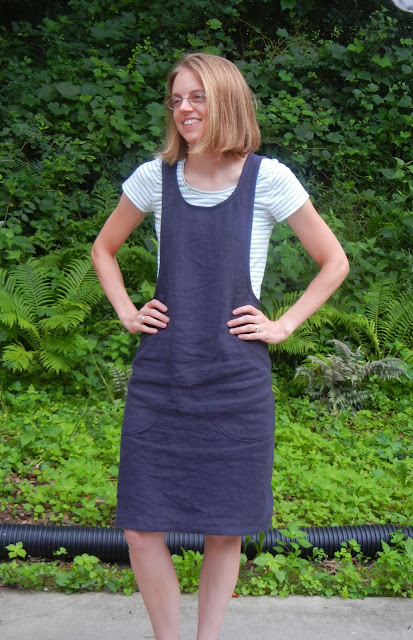
Then I dug into some 100% linen I recently purchased.  One of my goals for 2018 is to expand my knowledge on garment fabrics (so different from quilting cottons - so many choices!) and linen is one of the substrates I want to try.  I'd say my first try was successful.  Its not difficult to work with, just different.  Though it seems oddly stiff and scratchy as you cut it, the end result is a surprisingly light and breezy and comfortable garment.  


The York is a great instant gratification pattern.  Four pattern pieces - front, back, two pockets and you're done!  Cutting and the initial construction goes lickety split.  The bias binding takes some time but I absolutely LOVE the clean finish you get on the inside.  


Quick hem and off you go!  I made a size XS and that seems just about right.  I love the placement and size of the scoop pockets - they're perfect.  The hip area and skirt are just right too.  The two things I tweaked on my second version were on the upper bodice.  I lowered the neckline scoop one inch at the center front (one inch lower than the higher neckline offered in the pattern, that is) and also widened the bodice at the center front.  On my denim one the straps felt too close to my neck to be comfortable.  Between the closeness to my neck and the neckline being a bit snug I found myself always readjusting so I wouldn't be choked by the pinafore when I sat down.  Lowering the neckline  and widening the center front makes everything sit in the right place.  Its more comfortable and it stays put.  (I did a 2.5 inch total slash and spread of the bodice area on the front and back pieces - so 1.25 inches from the center fold - and blended that wider bodice into the bottom of the armhole area to keep the proportions/design lines the same.)  Those adjustments also make it much easier to put on... with no closures, a too small neckhole, and a pretty straight skirt its a bit of a trick to get the denim one over my head!

Too tight...


Just right...


(Old Hat New Hat anyone?   :)  Can you tell I have a one year old?!)


I now have two new wardrobe pieces that are comfortable and casual but a little nicer to wear than just shorts.   I've worn them both out and about a few times and really enjoy them!  I hope they'll work over long sleeves in the fall but we'll cross that bridge when we get there.  Related to this make, I've got my eye on this pattern for the future... a similar look but an A line skirt and different back.  Don't expect that anytime soon, though.  Warp speed doesn't come around too often!  
Friday, July 13, 2018

Covered Notebooks... from Orange Bettie tutorial

Need a quick and useful gift?  
I've now made a couple of these covered notebooks using this tutorial from Orange Bettie.  I made one for a teacher gift back in May and now have made another one for a gift for a friend.  

The tutorial is well done.  It doesn't take long to cut out the pieces and the construction is logical and quick.  The pockets are useful and the snaps add a nice touch - it feels more polished than a velcro closure.     

The blue one was the teacher gift... 


and this linen and floral was the friend gift.  


I feel like the attached elastic bookmark and the back pocket for paper and a pen make this cover very nice and functional - more than just a fabric wrap.  The ability to refill it with standard sized composition notebooks (less than a buck at Walmart) make it a long lasting gift.  


I also love personalizing gifts with a bit of embroidery.  
This particular friend is a devout Bible reader so I'm thinking she'll use it for notes or a prayer journal.  Enjoy!  


Carolyn Pajamas by Closet Case Files

This project is another one that is oh so enjoyable because its oh so useful.

Store-bought pajamas drive me batty because the sleeves and pants are never long enough.  I'm tall and thin so either they fit my midsection but my wrists and ankles stick out or they're big as a tent to give me enough length.  After years of musing about it I finally got around to making myself some.  I chose the Caryoln Pajamas because of the description of a 'modern fit' (hoping for something not too matronly looking) and the piping (which I decided to skip on these pairs while I tested out sizes but I'll definitely do that detail on future makes).

I planned and made a flannel pair first, but it took me so long to make them that by the time I finished it was too warm for flannel. Drat.  I quickly bought some cotton shirting and made another pair so I could try out a few alterations while they were fresh in my brain and have a summer pair.  I had enough summery fabric to make two shirts (one long sleeve and one short sleeve).  I'll enjoy the flannel ones come fall. 

Fabric:

Round 1:  mint flannel from JoAnn's
Round 2:  green/white dot cotton shirting, also from JoAnn's

I'm happy with both!  The shirting especially is nice for summer - its cool and crisp and comfortable.  It requires ironing but if you think I'm going to iron my pajamas you're crazy.   Here they are in all their unpressed glory. 


Pattern:

Fit and style are good, instructions are okay.  Not the most detailed instructions in the world, especially around the collar and facings area.  In my opinion, a back facing would be simpler than the way she does it and I'll probably draft my own back facing pattern piece the next time I make them.  Also, I didn't follow the pattern's button placement guide because the top button would have been too low.  However, that messes up the lapels and how they folds so they usually stick up a bit and are more closed than intended.  Fine by me!


Alterations needed: 

Lengthened the crotch area of the pants by a full inch.  The shirt I had to size up significantly on my second pair.  

Now I feel like I've got it down and can make a pair of nice pajamas whenever I need them! 

Thursday, July 5, 2018

Minimalist Wallet from Noodlehead/Anna Graham... with matching bag and key fob

Hello again!

I've had (a smidgen) more time to sew lately so I have a few completed projects to share. 


My current wallet is many years old and on its last legs.  I received Anna Graham's Everyday Essentials booklet for my birthday so I tried out the Minimalist Wallet pattern.  I am definitely a minimalist when it comes to things I carry with me so I thought I'd give this tiny wallet a whirl. 


So fast, so easy, such a well done little pattern!  
Seriously, it took me probably twenty minutes one evening to cut out all the pieces and then I thought I'd sew it in little bits of time over the course of a weekend.  (All my sewing happens in little bits these days.)  Well, in the end it might have taken me a total of one hour to sew.  Probably less, I wasn't really watching the clock, but before I knew it my wallet was complete!  I'll have to keep this pattern in mind for quickie gifts.

Then I thought I'd whip up a key fob to go with it.  My current wallet and current key fob happen to match (though I got them years apart and it was a total accident) so I thought it'd be fun to continue to match.  I had the fob hardware on hand and the scraps from the wallet still on my sewing table so that was a ...  hmmm ... maybe seven minute project.  :) 


And since that all went so quickly and I still had some fabric left I whipped up a little minimalist bag to go with it.  Now that my baby is almost a toddler and doesn't ride in an infant car seat anymore I find myself occasionally popping into stores for 'just a thing or two' and leaving the heavy diaper bag in the car.  Great in theory, but then I have a baby in one hand and have to carry my wallet and keys in the other hand.  Which leaves zero hands for shopping AND often the baby in hand #1 is grabbing at the wallet and keys in hand #2.  Very squirmy.  So now I've got a small crossbody bag (out of her reach!)  to carry my wallet and keys and sunglasses while we pop into the store.  At least I'll have one hand free, right? 


This bag is about as simple as it gets - an 8'' by 8'' square with small boxed corners and a slip pocket on the front (mostly so I could add that edging of accent fabric to match the other projects).  I had drafted a fun-looking asymmetrical integrated strap, but then didn't like how it was turning out so I hacked off the strap and added eyelets on the sides instead.  Much better, despite the pain of hitting my thumb with the hammer like a dumb blonde.  Its small and light and easy to toss in my gigantic diaper bag and will fill a specific need.


  The fabric for all these projects was already in my stash - some quilting cottons for the wallet and key fob, and a funky stiff micro-stripe denim type fabric for the bag.  

Useful things are my favorite kind of projects to sew, whether they're for me or for gift giving and I'll be able to enjoy this new wallet and purse just about every day!