Welcome to Anne's sewing blog!

I started this blog in 2012 in an attempt to keep better track of all the little things I make. I have found it fun to 'catalog' what I make so I'll continue to post my finished projects as they appear.

Its mostly for my personal use, but also gives me a way to share cute stuff with my craft-oriented friends and family. Enjoy!

Friday, August 11, 2017

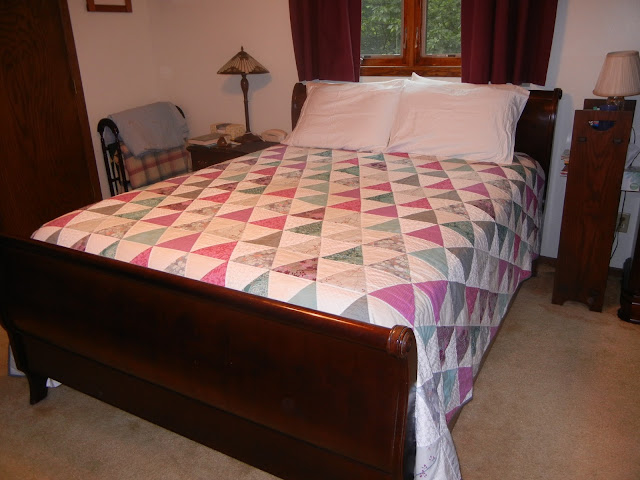
Finished Quilt - Triangles in Mint, Pink, and Grey

I can share a big quilt finish today.  (Then I think I'm all caught up on cataloging/blogging sewing projects and I'll just hang around and wait another week or ten days for this baby to show up!)


This is the quilt folded in half - roughly 50'' by 100''.   Holding a 103'' square quilt up off the ground is no easy feat!   I know I'm not a great photographer and was trying to get some natural lighting on a quasi-sunny day.  This mix of indoor and outdoor photos will have to do.  My helpers are only interested in helping so long...


This quilt is 'just' for us - a lightweight summer quilt for our bed at home.

Our previous/current summer quilt is great (its this Star of Bethlehem quilt from 2008...pre-blog days) but not quite large enough.


It covers the top of our queen sized bed, but only hangs over a couple of inches so by the time you get two adults underneath there are lots of air holes and blanket wars going on.  So this new quilt was purposely made huge so that it has a large drop on three sides.  The finished quilt is roughly 103'' square - pretty giant!


I felt very indulgent in choosing everything for this quilt.  I chose a pattern I liked and chose my favorite colors.  Its a little girly, I admit, but my husband doesn't really mind.  I love the geometric and scrappy-but-not-too-scrappy look.  I spent time on Pinterest picking quilts I was drawn to and they all had similar qualities - all the colored triangles going one way and solids going the other way.   It made for a very easy repetitive piecing process, thats for sure.  The triangles are all 6'' per long side.  The white triangles are a mix of four different white-on-white or light grey-on-white prints and there are eight different colored prints in a mix of mint, pink, and grey.  I hand quilted 1/4'' from the sides of all the white triangles.  The back is a subtle grey-on-white print.  The batting is 100% cotton.  This is definitely the brightest/whitest quilt I've ever made and I love it.


I started in November 2016, cutting all 600+ triangles at home (using a rotary cutter and acrylic template).  Then I got a good head start on piecing (by machine) at a weekend long retreat in November, did another chunk of piecing in December/January while on Christmas break, and then finished the piecing in late spring after a mad rush at work and after morning sickness subsided.  It got loaded on the quilt frame in April and I hand quilted it row by row, finishing in July.  Having a baby in August is good motivation to get. the. job. done!  :)


Can I just say how much I love my Grace Company hand quilting frame?  I put in all the extenders and was able to just barely fit the 103'' wide quilt.  Its so nice to have such even tension all the time and never have to move a hoop around.  And I'm super blessed to have a huge sewing room so there is a wall long enough to accommodate a frame thats 110'' end to end!

 Its been on the bed for a week or two now and we love it.  The best part is I know it'll only get better and softer with use and washing.

Yeah for my 2017 quilt!  


In the works now is a paper pieced pillow top from the scraps to match.  I hug a throw pillow at night and the current pillow cover is both a complete clash of colors (navy, red, and white - doesn't match this quilt at all) and its getting threadbare.  A perfect excuse to make a new cover and use up some scraps.  Pleasant hand piecing for these summer evenings...

Tuesday, August 8, 2017

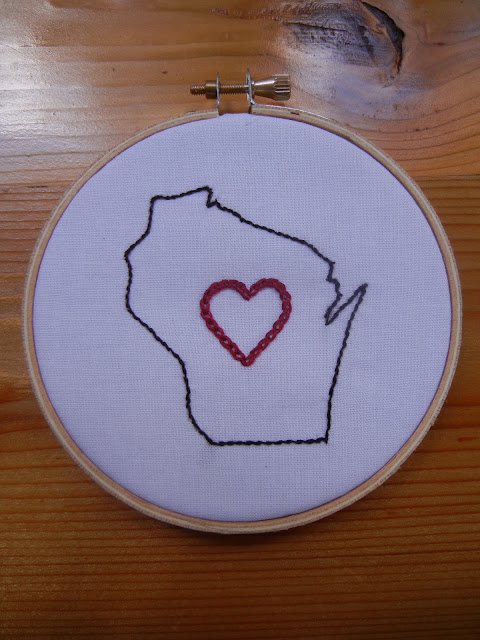
La Crosse, WI themed embroideries

I did a bit of hand embroidery this summer.  My kids sold crafts at a farmers market and I made a few things to sell on the side to help pay for the table fees.  These were quick but enjoyable little things to stitch up, have a bit of local flavor to appeal to the local foodie crowd, and sold well.  I think I made eight or ten total and only after selling a bunch remembered to take photos of a few I still had left.


They are all DMC embroidery floss on either solid quilting cotton or some linen pieces I had.  
The hoops are cute little 4'' hoops.  

This one is obviously not local themed, but a worthy sentiment nonetheless.  
I made a few in different colors.  
Since the stitchery itself is super simple, I used the chain stitch to jazz it up a little.  


This one would only mean something to someone from the La Crosse, WI area as the blue design is a representation of our 'Big Blue Bridges' that span the Mississippi River.   The ones I stitched with the bridge design were the most popular - I was gratified that everyone recognized them easily since I just drew it freehand until I thought the proportions looked correct.  


Another La Crosse themed one...


And this one is a little broader and would work for anyone in the state of Wisconsin.  


They were fun to sew and got really good reactions at the farmers market so I'll just tuck the idea away in my brain for future similar situations and/or as a good gift idea for people who appreciate where they live!  

The back I covered in another layer of cotton or linen so the stitches/knots wouldn't show, set them in the hoop nice and tight, trimmed away the excess fabric, and then ran a bead of glue around the edge to both stop any fraying and give it a bit of a seal around the edge.  Nice and clean and tidy looking.  


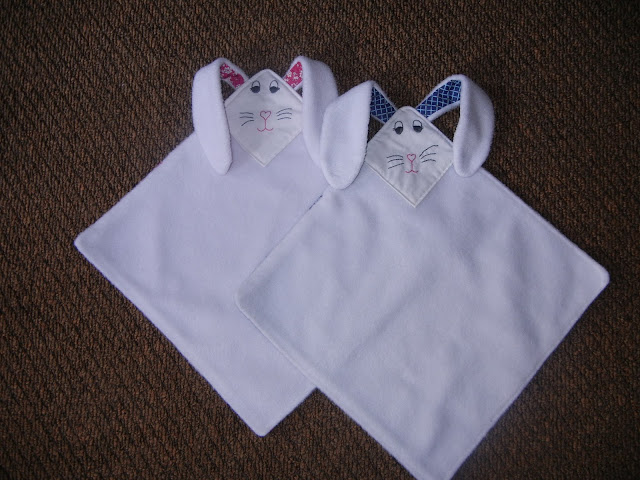
Baby Bonnets and Bunny Loveys

I've done some small baby sewing here in the last few weeks as my due date gets closer.  I've found it more fun to 'nest' by sewing cute little things than by cooking and cleaning - big surprise there!  :)

First up is two bonnets from this free purlsoho pattern.  They were quick and easy and oh-so-tiny!  The pattern comes in many sizes so I made the 0-3 month size.  They pretty much fit 18'' dolls.   They sew up fast and I've seen so many adorable version online that I hope they fit well and are useful and I can just keep making up more and more as the baby's head grows to fit the proper seasons!  One pink and one blue since we don't know what this baby will be.


The second bit of baby sewing I've done is these lovey blankets.  They are everywhere on Pinterest... I didn't really follow a pattern I just made them up.  They're around 12'' square, so small enough to he a hand-held blanket/lovie, not a cover up and keep warm kind of blanket.  


The face is hand drawn and then hand embroidered.  One side is fleece and the other is cotton.  If I make more I'll pick some higher quality flannel or brushed cotton rather than fleece, but this is what I had on hand this time around when the mood struck to make them.  


I could see making many different animal shapes/faces so maybe they'll resurrect themselves again later on as useful baby loveys in our own house or as gifts for others. 


Saturday, August 5, 2017

New Bucket-Style Bag

I enjoy making bags and totes and get the urge every summer for a new purse.  I need a new bag like a hole in the head but I enjoy trying out different styles and techniques.  This is my new bag for this summer:


 It came together very close to what I envisioned in my head (not always the case) and its been a great bag all summer.  The new things I wanted to try were 1) grommets along the top, 2) the combination of denim and this pink print, 3) an oval shaped base, and 4) custom interior pockets for things I actually carry on a daily basis, and 5) a strap that could be used in multiple ways.  

I am very pleased with the fabric combination.  The denim is very sturdy and the pink is pretty.  It's lined in canvas and the oval base portion of the bag is heavily interfaced so the bottom of the bag is nice and sturdy and holds its shape well.  

The grommets along the top are fun and trendy and work pretty well as a closure.  They were more challenging to install than I anticipated - too many thick layers - but I made it through without ruining the bag so was thankful for that.  I debated on what size grommets to use.  I ended up using these large ones because I thought they fit the scale of the bag, the strap of the bag could then be the same size as the grommet ties, and probably most importantly I had these already in my sewing room as leftovers from a curtain project.  Smaller ones would have been fine too, with a thinner grommet tie.   I use a belt buckle to hold the grommet ties shut and that works well.  I don't slide it open and closed too often - I've just found a nice intermediate spot where its easy to get into but stuff doesn't fall out.  Now that I've found a good length I like I could shorten the pink ties but haven't taken the time to do it yet.  The interior pockets are useful and I use the one outer zip pocket more than I thought I would so I'm glad I took the time to add it.  

The strap was an interesting experiment.  I envisioned it being able to be used three ways and only two of them really work.  They're the two most important so I'm happy with it - it just means those d-rings on the base of the bag are a bit unnecessary and don't get much use.   

Strap configuration 1 is from the top d-ring to top d-ring and makes a long strap for cross body wear.  Very handy and just the right length.  


Strap configuration 2 is from one top d-ring, across and through the other top d-ring, and then back to buckle on the first one again.  This means two clasps on one side and a double strap for shoulder length carrying.   This is the one I find myself using most often.


Strap configuration 3 is the one that doesn't really work.  I had thought I could use the strap to go from one bottom d-ring to the other, feeding through the top rings to keep them straight, and it would be another version of a shorter strap.  As it turns out, the bag itself isn't sturdy enough and it just kind of slumps down.  Good idea in theory but not in practice.  So, I don't use it that way and those bottom rings are a bit superfluous.  Oh well.   I enjoy the totally removable strap and its ability to switch between cross body and shoulder so thats a win. 


Eh - too slouchy.  


Here are a couple of flat shots - I designed the bag from scratch and used dimensions I knew I would like from previous bags.  


And a few more random photos... 


And one more with the 38 week baby bump just for fun!  


Friday, August 4, 2017

Maternity Trial and Error

I have a few maternity experiments to share today as I try and catch up with cataloging projects before our new baby arrives...

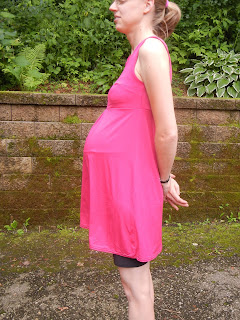
First, I wanted to record some shirts I've made this summer.  I've purchased/borrowed a few maternity  shirts along the way but found myself running into the same old problem I have with non-maternity shirts... I have a very long torso and shirts are often too short.  Add a baby bump to the situation and many shirts, even so-called maternity shirts, are now ridiculously too short.  So I exercised my drafting skills and used up some knits in my stash to make some shirts.   I made them when I was about 25 weeks or so, these pictures are taken around 30 weeks, and unfortunately I grew out of them pretty fast.  They were useful for about a month or so before they became too tight, both around the bump and around the chest/armhole areas.

I started with my trusty made-to-fit Renfrew block and went from there.  On most shirts I made two adjustments - I added width/swing to the front bodice piece and also added 3-4'' of length to the front which I then gathered to meet the length of the back bodice.  That allows room for the bump but keeps the bottom of the shirt snug instead of 'tenting' out in front.  Each shirt had slightly different results due to different knits, but they're all workable and do the job of covering the bump.   The necklines and armholes are a mix of knit self-bindings and turn-and-coverstitch hems depending on how much fabric I had to work with.


This white one was truly a scrap buster in that I had to piece the front to have enough fabric.  It worked well, though, to add a few gathers under the bust as well as along the side seams.


Thanks to Leah and Grace for taking these photos one day.  We won't talk about how many outtakes had to be deleted to get these couple of halfway decent shots....  

Overall I'm happy with the shirts, they definitely served a purpose, I was glad to use up some of my knit stash, and it was fun to do a little drafting experiment.  We'll have to see if I take the time post-baby to remake the shirts into non-maternity or if they just live a good life this summer and then disappear somewhere.  

The other experiment I'll share is my rush-job whack at a maternity swimsuit.  I whipped this up in one week's time right before we went on a vacation in early June.  I didn't have any swimsuit elements that fit, didn't find anything cheap at our local stores, and thought it would be worth the work to try and make something so I could swim on vacation and over the summer with the girls.  


Its not beautiful by any means, its an embarrassment as far as drafting goes with some pretty glaring errors (bust dart placement for one), but it works.  It keeps me covered at the pool, and it hasn't fallen apart.  I used up lycra I already had in my stash, with literally only inches of spare fabric when I finished, so it was even cheap/free in that respect.   I have to wear a store bought sports bra underneath for support, but again, for the little use this is going to see I'm fine with that.  

Its been an interesting summer because I'm drawn to sewing clothes and following lots of blogs about sewing clothes, but don't find it worthwhile when I'm pregnant and changing shape all the time.  So I've been sewing other things (big quilt finish post coming soon) while making a HUGE mental list of all the clothes I want to sew when I'm back to 'normal' size.