Welcome to Anne's sewing blog!

I started this blog in 2012 in an attempt to keep better track of all the little things I make. I have found it fun to 'catalog' what I make so I'll continue to post my finished projects as they appear.

Its mostly for my personal use, but also gives me a way to share cute stuff with my craft-oriented friends and family. Enjoy!

Thursday, February 6, 2014

Baby Boy Crochet Blanket

This is my latest crochet project.  


Quick post because there isn't much to say.  Its for a teacher friend who is having a baby boy soon.

 I thought I'd try a circular blanket just for something different.  I think it's alright - not fabulous, but alright.  I definitely got practice in doing regular increases (to make the circle shape) which was one of my reasons for trying a circle blanket in the first place.  I wasn't perfect and am a little disappointed in how the joining stitches turned out - either I didn't do them quite right or I should have worked in a spiral rather than separate rows because you (or, I, rather) can really tell where that crooked row of joining stitches lies.  However, I'm learning by trial and error - and I'm okay with that.  :)

I love the colors and the texture/softness - its very snuggly.   Hopefully it will get used and snuggled and drooled on and dragged around the house by an active little boy!


New SuperWarm Quilt for Living Room

There's another new snuggly quilt around the house...


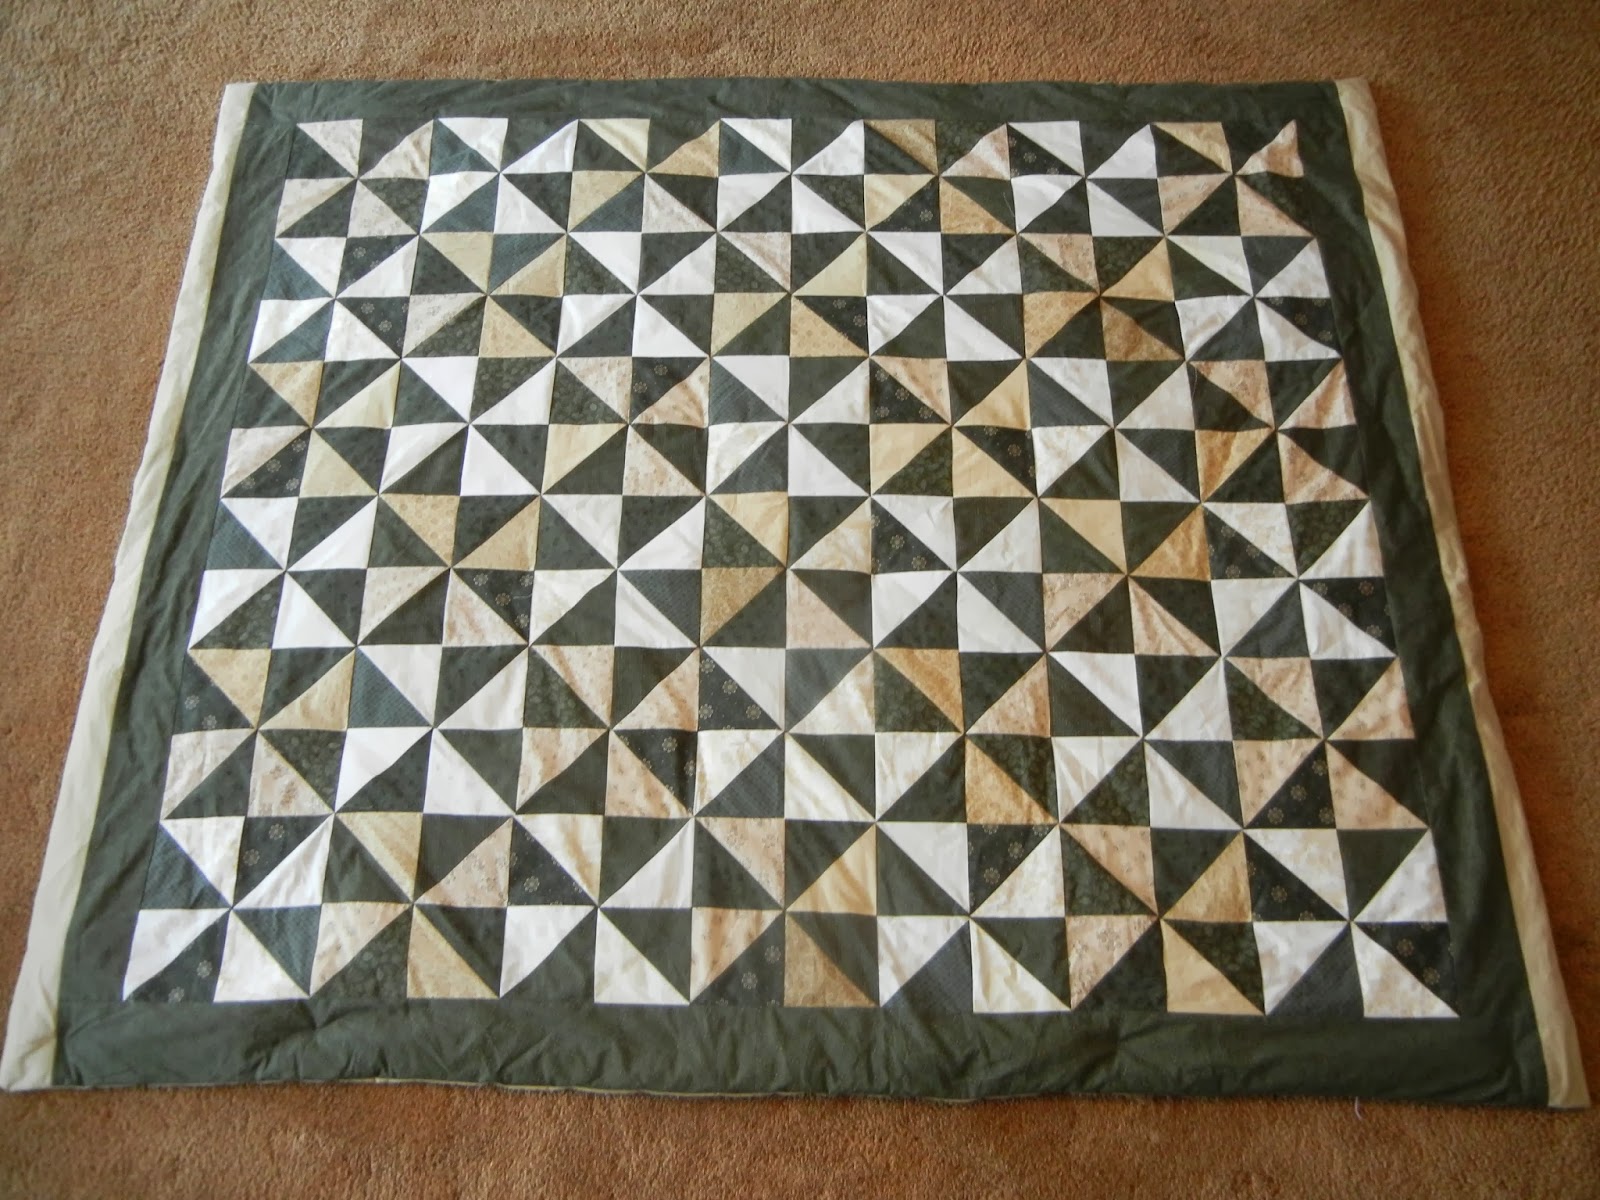
This quilt is nothing fancy, but it has been a long time in coming.  It is a special quilt in that it replaces a well-worn and loved favorite.  Keith had two quilts from his ancestors that he particularly loved.  Both were blankets more than quilts, because they were made from sturdy blue fabric.  No piecing or fancy patterns, just blue.  They were well worn (one of them bordered on threadbare) and both were filled with old wool batting.  While I appreciated their warmth, I felt like a quilter's wife should have pretty quilts to snuggle under rather than dilapidated blue blankets.  :)

The thinner one got replaced in 2010 and now it came time to replace the thick, fluffy, super warm, gotta-have-in-winter blanket.  I dismantled the blue cover and collected all the wool batting.  Some of it was still together but much of it was loose and balled up in the corners.  I had the wool cleaned, recarded, and encased in cheesecloth.  I found a company in Minnesota that did it by mail with great service and a very reasonable price.

Here is what the clean recarded wool looked like.  Its about 80'' by 70'' (about a double bed size).  


I wanted this quilt to be pretty traditional and the pinwheel block is one of my favorites.  I had accumulated a lot of tan/beige/off white fabric in my quilting cotton stash so I decided to use that and bought a mix of dark greens to go with it.  

Since the quilt batt was very puffy (a healthy 2'' in loft) and already in cheesecloth tied with yarn, I decided to put it together like a duvet cover.   That way I have the option of taking the cotton cover off to launder.  Having completed that task I'm not sure I would do it again.  It was no walk in the park to measure the fluffy batt, piece together a backing with a long envelope style slit in it, and then wrestle the big yet somewhat fragile batt into the duvet cover so it all laid flat for tying.  I basically took this picture so that when I make another duvet cover for my other wool batt (yep, I got lots of wool recarded so we'll have two of these!) I'll remember NOT to do it this way...


I'd definitely do an invisible zipper or some other method instead of the envelope backing - that was the biggest pain.  We'll see how this holds up.  I also ran annoyingly short on green fabric and was too stubborn to go buy more.  Seeing as the backing was beige I thought I could just fudge and put a strip of beige on the top and bottom.  I'm sorry to say it looks hokey and exactly like I ran out of fabric.  Oh well.  It is tied with embroidery floss through all the layers - cotton duvet cover, cheesecloth, and wool batt.  

All that being said, everyone fell in love with it the minute they crawled under it.  You just can't beat real wool.  This thing is crazy warm, yet lightweight.  Its the kind of quilt that you take a nap under, and then find that you just can't bear to get up off the couch because you are SO warm and cozy.  Its been used every single day since I put the last stitch in and I'm sure will be used every winter for many years to come.  Three cheers for saving old wool - it's definitely worth it!   

Tuesday, February 4, 2014

Birthday Quilt for Grace

Its time to show you Grace's birthday quilt!

She turns six next week and this is HER quilt.  She informed me this fall that, "Daddy has a special quilt, you have a special quilt, and Leah has a special quilt... everyone has one but me!"  She was 100% correct.  Bad mommy.  :(

I made Leah one when she turned five because she had outgrown her baby blanket and her feet stuck out the end when she tried to cover up with it.  Now it's Grace's turn (and we're focusing on the fact that she's grown soooo big, not on the fact that Mommy got a year behind on this one somehow).  Her old Kitty Blanket is way too short and has seen better days.  This new, bigger, made-just-for-you quilt will keep her cozy warm for a while to come.


I tried to make the quilts similar in style and size (lest we have any arguments about someone's being bigger or 'special-er').  You can see Leah's quilt on the Finished Quilts tab.  My inspiration for the quilt's background was this quilt from Pinterest.  I don't think I quite hit the mark on this attempt - I think my colors are a bit too saturated.  I'll try again on a smaller project.  Its still pretty, though.  Grace specifically requested pink so I went a bit heavy on the pink shades.

The embroidery is all done by hand and portrays things that Grace loves, characteristics she has, or things about her that are special to me.

She loves cats....


  ... her favorite snuggle is named Cutie 
(but was named Meow for years before undergoing a name change about a year ago)...


...this kid sings ALL DAY LONG... 


... she loves her Lord and shows it boldly...


... has closed every prayer with these words since age 4...


... will do anything for a snuggle...


... and her six year old handprints.


I quilted it by machine for sturdiness.  I expect it will get washed often.  I used cotton batting for the same reason, plus to make it an all-season quilt.

Every quilt gets a label, of course.


Grace has seen the quilt background before it was embroidered.  She watched the hexagons come together into the cool background and knows I've been working on the 'secret part' after she goes to bed at night.  In fact, every once in a while she'd tell me, "Don't forget to work on my secret quilt tonight Mommy!"  

She will receive it next week and I'm sure she'll love it!  


Details/notes to self:

1. Hexagons are 4 inches finished.  Cut with acrylic template.  
2.  Pieced one edge at a time, stopping at each quarter inch seam mark.  It worked well but I wouldn't want to do a big quilt of hexagons - kind of putzy and tons of thread trimming.  
3.  Quilted by machine first, then embroidered to avoid quilting over the embroidery.  I'm not sure I'd do it that way again - this method meant lots of burying of embroidery threads so as to not leave knots on the back and in the end most of the motifs ended up being within a single hexagon anyway.  Such things happen when you design on the fly!  :)    
4.  I am still working on the perfect blend of quilting and embroidery.  The embroidery motifs have to be small enough to easily and uniformly quilt around, but not so small that they are hard to see.  I do love to combine the two techniques, thats for sure.  

Thursday, January 30, 2014

Doll Clothes Factory January 2014

Ahhh... Doll Clothes Factory.

I invented Doll Clothes Factory to gain control of the syndrome called "Mom, Can You Make This For Me Really Quick... It Won't Take Long At All... I Promise''.   Whatever doll related game the girls were playing at the moment required a specific (fill in the blank) dress for that particular game.  One day they'd NEED a princess dress, the next day they'd NEED a fairy dress, the next time it would be a Robin Hood archery outfit, then they'd REALLY NEED a mermaid costume, etc etc etc.  The girls are correct in that doll clothes don't take very long to make, but they do take some time, some planning, and its really annoying to have to take a break from a complicated mommy project to quick whip out a doll clothes item.

So... I instituted the Doll Clothes Factory.  It opens, just like a real world factory, and all kinds of fun doll clothes get made in a short amount of time.  Then, importantly, the factory closes and no other doll clothes are made until the factory opens again.  That could be a time period of a few weeks, could be a few months, only Mommy knows. :)  While the Doll Clothes Factory is closed, there is a sheet of paper in the sewing room and they write their requests on there so that they are remembered the next time the factory opens.

The plan has worked fabulously!  When you plan and make a bunch of doll clothes all at once it goes incredibly fast - a couple dresses a day.   Then, when I get sick of making doll clothes, the factory closes and I am released from the impulse-doll-clothes-sewing by simply saying, "Sorry, the factory is not open today.  Write your order on the list."

One more thing before I show you the results of the January episode of Doll Clothes Factory:  when I do impromptu sewing I hesitate to use my best, favorite, or prettiest fabrics.  I generally let the girls choose what they want, but they are only allowed to look in 'their' fabric (the uglies) and not in my closet of 'good mommy fabric'.  One of these days I'd like to pre-plan some doll clothes and open the factory in secret for a day or two so that 1) the clothes are as cute as can be, rather than in gaudy fabric and 2) I can sew them without someone over my shoulder saying, "Are you done yet?  Are you done yet?  Can I try it on Dolly yet?  How many minutes until its done?"

After all that explanation, here is what was made right after Christmas to clothe the new dolls:


Cute pink skirt and shirt 
(this fabric did come from my 'good mommy fabric' closet)


Dress from scraps of old Christmas dress with bias tape bound edges


Circle skirt and crossover top from more Christmas dress scraps


'Comfy pants' and a long sleeve white tee shirt
(should do a different, less bulky waistband on this patten next time)


Pink capri pants
(modeled with the gold shirt because Leah thinks they look 'jazzy' together) 


more casual wear (made from fleece scraps)
I love the white trim on the sweatshirt.  

All the clothes so far were made from patterns from this book by Nancy Zieman.  I highly recommend it if you want to make doll clothes for 18'' dolls.  It lays everything out very simply and has a decent variety of mix and match outfits.   I've even taken those pattens and adapted them to fit other dolls with minimal effort.  

These next two I made up off the top of my head.  They still need a few tweaks (the backpack for sure) and are made of really terrible fabric, but they were chosen by the girls and I figured first prototypes could be ugly.  


Wouldn't this cape be adorable in a tweed or wool with trim around the edges?!  
Just try and imagine that rather than wild swimsuit fabric.  :) 


This is my very rudimentary backpack.  The pack itself is a rectangle folded up on itself, with a pocket.  The straps are scrap webbing I had laying around and I added velcro tabs so you could unstrap the straps (versus having the twist the doll's arms around at cockeyed angles to feed them through the straps the way we humans do when we're putting on a backpack).  The purple ribbon is a loop Leah sewed on as an afterthought so that her doll could hang up her backpack.  

I seem to think there was another skirt somewhere and I know I made a short sleeved white tee shirt but I guess we couldn't find those when we did the Doll Fashion Show and took pictures.  

The factory will probably open up this spring sometime to make more summer outfits for the dolls.  I have to remind myself to plan ahead and get some really cute girly fabric and trim so we can do a little better than digging through the scrap bin.  :)  


Sunday, January 5, 2014

Flannel Nightgowns - for girls and dolls

This is another Christmas present for the girls - snuggly flannel nightgowns.


I stumbled across a super soft flannel with clouds and moons that was perfect for nightgowns.  I used a vintage pattern I have in my drawers and added the ruffle at the bottom.  They are long (all the way to the floor!) to keep those little legs warm and the sleeves are nice and long too.  Hopefully they'll still fit next winter!

I added some stripes of bias tape in different colors onto the yokes so that I can tell them apart easily in the laundry without having to hold them up to see which is longer.  The backs have a simple placket and a snap.  


We also acquired two new dolls in the house this Christmas, so they got matching nightgowns as well, with stripes on their yokes to match the colors of their "mothers".  


I was running out of time so I just used a dress pattern I've used before for other dolls rather than searching out a true nightgown pattern which would probably have had sleeves. Oh well.   I was also running low on fabric so the doll nightgowns had to have the skirt portions cut with the clouds on the opposite grain (going up and down instead of sideways).  Because I'm picky I wish it wouldn't have worked out that way, but Leah and Grace don't seem to have noticed.  :)  

More doll clothes coming up soon.  


Monday, December 30, 2013

2013 Christmas Dresses

This year's Christmas dresses for the girls were a smash hit.  

The girls each chose their own colors and gave me design ideas/drawings.  I then drafted patterns from scratch and made the dresses.  I am happy to report that my custom drafts worked well and the dresses are great!  They are a huge improvement over last year's dresses in both design and construction.  Last year's designs were about as plain as you could get and had more sewing errors than I care to admit.  This years are a little more fancy/complicated in design and I can assure you are far more properly and professionally sewn.  

The pattern drafting (on paper) went fairly smoothly.  After a first fitting (made in cotton) I was able to see where things were going awry or didn't fit quite right, change the pattern on paper, do a second fitting and fix the problems.  One of my goals for 2013 was to learn more about pattern drafting and I feel like I have accomplished a lot in that regard.  I still have much to learn, but I have come a long way in just a year. 

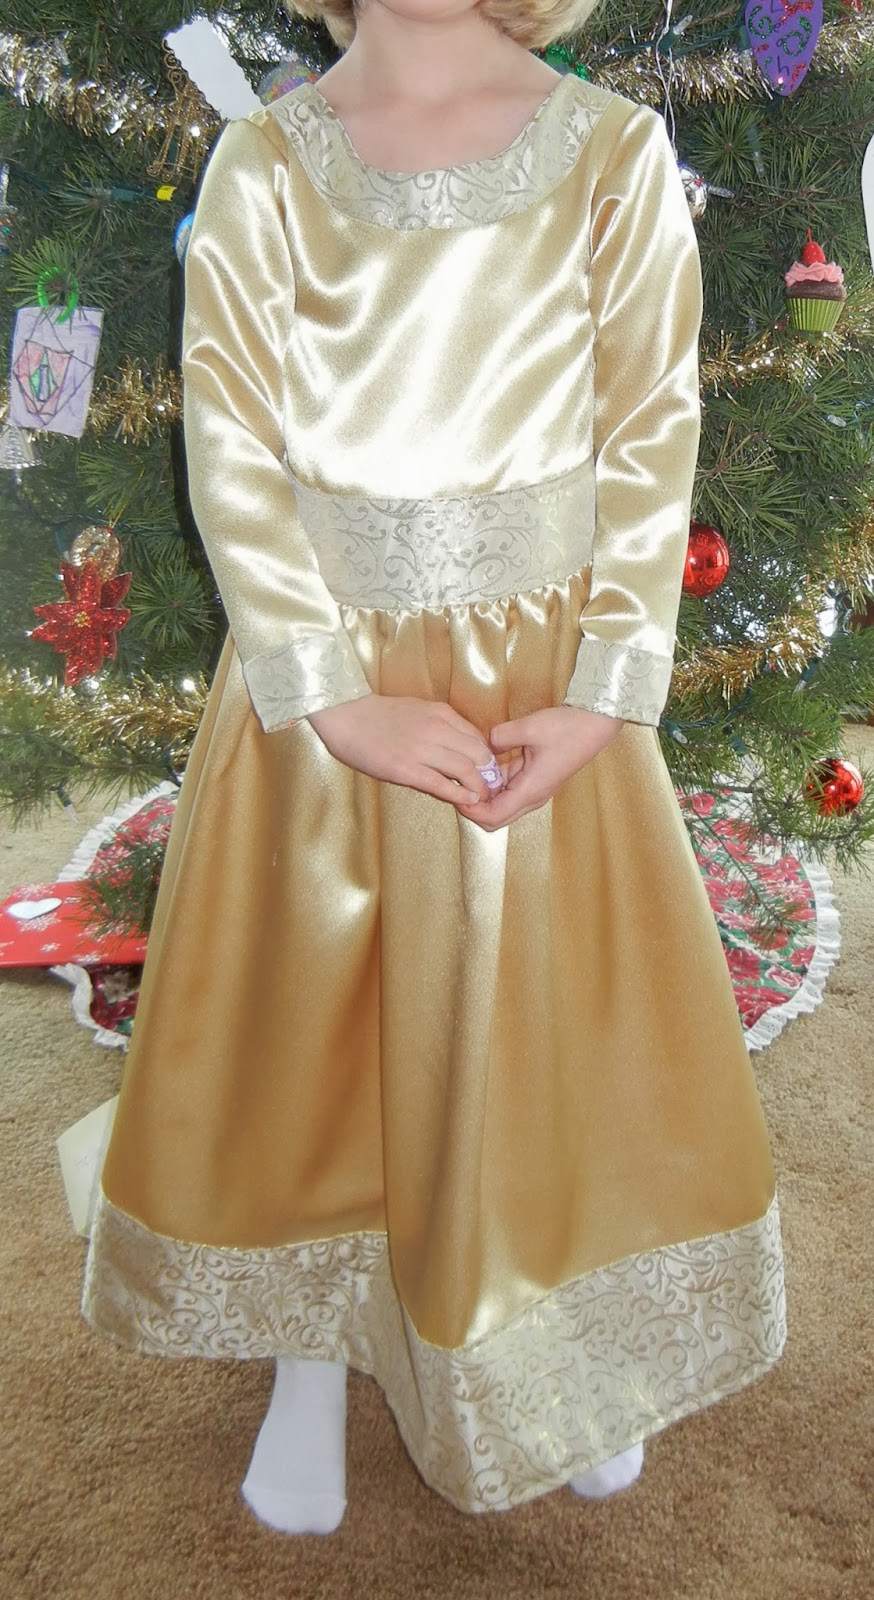
Here is Grace's gold dress: 


It is gold satin, with a gold-on-gold satiny fabric as the trim.  
I trimmed/faced the neckline and cuffs with about a 2'' band and the waistline and hem with a wider 3-4'' band.

These photos unfortunately don't do the gold color justice.  The fabric and trim coordinate perfectly and are really gorgeous.  For better or for worse, Grace instantly looks older when she wears this dress.


The bodice is a pretty standard fitted bodice and the skirt is a gathered rectangle.  If I could do it all over again, I'd make the skirt a wedge-shape or a partial circle skirt but I'm okay with it this way.  Grace would prefer more twirl, but the fact that it is her favorite 'shiny gold' color makes up for the lack of a wide swishy twirl.  


The back is pretty plain.  Two small things to point out are the fact that I now know how to do a lapped zipper so the zipper is not exposed, and that I now know how to properly put the layers/trims together such that the trim looks nice and not like a bunchy mess (see last year's dresses for examples of exposed zippers and trims improperly applied...see, I'm learning!)  


One other small thing to point out about theses dresses is that they have sleeves.  That might not sound like a big deal, but I have a bit of a phobia with sleeves.  After a few too many improperly-eased-having-no-idea-what-I-was-doing sleeves in my past that turned out terrible, I gave up and have done mostly jumper style no-sleeve dresses for the last few years.  Now that I have good books to learn from, and have practiced a bunch, I find they are not so scary after all.  This year I decided beforehand that these dresses were going to have sleeves no matter what.  I even drafted them myself and they worked.  So, silly as it might sound, I am very proud of these sleeves and can say that my sleeve phobia is lessening as time goes by.  :)  

On to Leah's dress:  


I love this dress too because its different from others I've made.  Its not a standard fitted bodice (although its close), the skirt has a different shape to it, and it uses layers of fabric.  

  Its made from red satin and red lace.  The back photo shows the lace layer nicely.  The 'underdress' or the plain shiny red is red satin.  The 'jacket' part is red lace over a layer of red satin.   The dress looks different depending on how the light shines on the satin and lace and I like the effect.  The 'jacket'/overlay parts of the dress are piped in red to set them off a bit and add to the illusion of the 'jacket'.  


The bodice started with plain red satin, then I added the 'jacket' part and the waistline satin band with buckle.   The top (bodice) is actually all one piece - the 'jacket' is just layered and topstitched on.  So you can't lift away the top part of the 'jacket' the way you can the skirt overlay.   Leah and I both absolutely love the satin belt with a diamond buckle.  It adds just the right amount of bling to the front of the dress and Leah was admiring the buckle all through her Sunday School program.  :)


The skirt is two separate pieces.  One 'regular' underskirt of red satin and then the overskirt of satin and lace.  This young girl has gotten really tall and the design of the dress really emphasizes that.  Who said these girls could look so grown up so fast?!  Certainly not me.  :)  

These two dresses came together wonderfully and I'm sure they'll get lots of use all year long.  
Three cheers for custom fit, modest clothing for young girls!  

Tuesday, December 24, 2013

Crocheted Baby Blanket - Pink

Hello there!

It has been busy busy busy in the sewing room and now that it is close to Christmas I can start sharing what I've been working on.  This one is technically a baby gift, not a Christmas gift, but since the time frames are identical in this particular case this project was part of the pre-Christmas craftiness.

I continue to enjoy crochet and decided to try a bigger project.  Thus far I've only done scarves, small bags, etc so this baby-sized blanket is big in comparison.


I am happy with the way it turned out.  I wasn't sold on the asymmetrical stripe at first but now that its done I think it works.  Could be a tad wider, maybe?  Looking at the picture above it looks a bit off-kilter but it blocked pretty straight and square when I finished it.  I suppose I'll have to be more careful when I take pictures of crocheted things.

The main portion of the blanket is all double-crochet stitches.


I googled how to make the flowers at the end and am pleased with them.  I made about five and picked which ones looked the best.


The edges are done in a scallop stitch pattern (from a library book).  The 'sides' are great, the 'ends' are a bit wavy.  I'll have to work on that part a bit more next time.


Overall, its a snuggly soft gift for a little girl about to enter the world.


Notes to self:  
-Used medium weight (4) yarn and gold hook (have to look up size later)
- Used 15 oz and 750 yards total
-Finished blanket was 30'' x 37''