Welcome to Anne's sewing blog!

I started this blog in 2012 in an attempt to keep better track of all the little things I make. I have found it fun to 'catalog' what I make so I'll continue to post my finished projects as they appear.

Its mostly for my personal use, but also gives me a way to share cute stuff with my craft-oriented friends and family. Enjoy!

Wednesday, May 21, 2014

Zip pouches

Here are two zipper pouches I made in April.  I used them as end-of-year gifts for bible study friends and also as a chance to try out a new-to-me method of inserting the zipper.

Zipper pouches are such great 'instant gratification' projects - quick, easy, and useful.  You can never have too many of these floating around!

This one you may recognize is made from scraps of my grey and pink dress.  One bible study friend and I had talked about how much we both liked the grey/pink color combo so this one was designed for her. 


Stitching it up reminded me, though, of my biggest pet peeve with zipper pouches - when the zipper opening is smaller than the width of the bag.  It makes it difficult to get things into and out of the bag, as well as hard to look in and see what you're digging for.  

I had been meaning to try this technique for a while and I gave it a whirl on the next bag. 


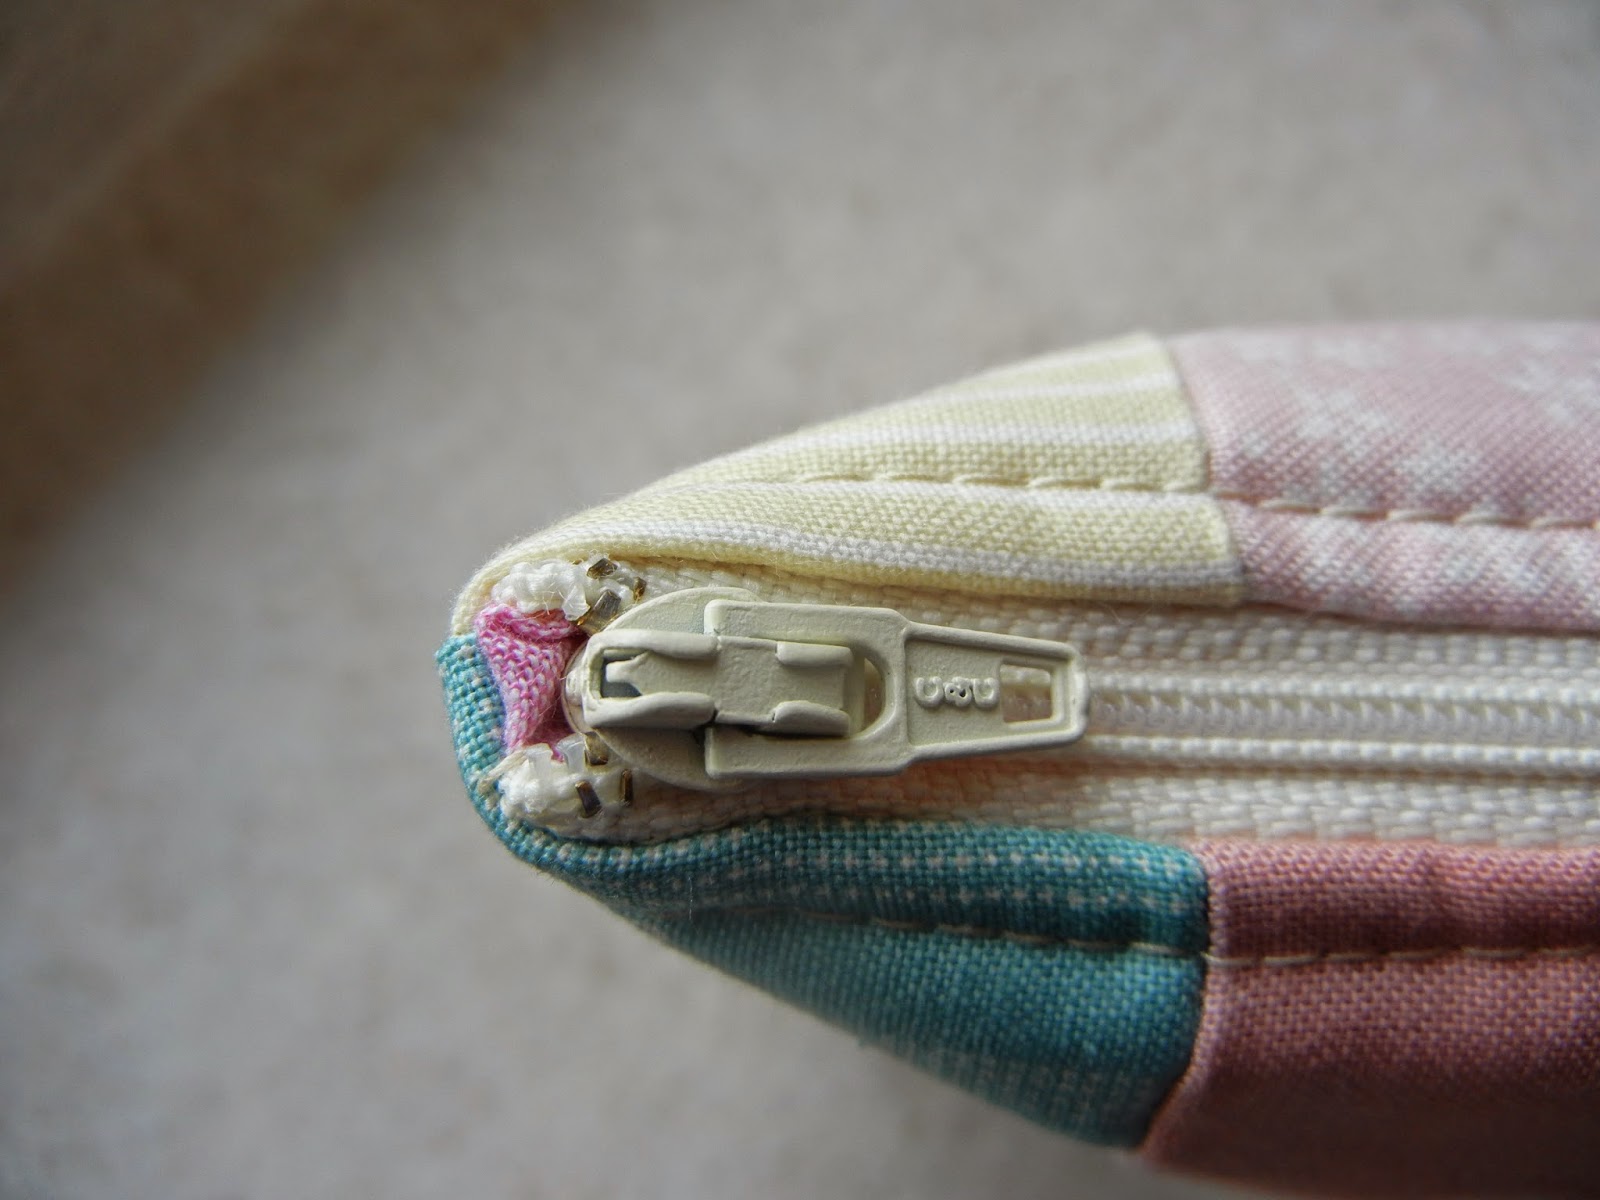
I love the nice snug finish to the front zipper end...


... and then the back zipper end extends beyond the bag edge with a little pull tab...


... so it can open all the way.  Slick.


(The lining is a bit too big on this one - I fixed that before I gifted it.) 

The outside of this one is scraps from a previous quilt project with a little bit of lace thrown in for fun.  


There are more bags in the works but they're not quite ready yet.  


Tuesday, May 20, 2014

Reusable snack bags - school donation

I whipped up these reusable snack bags in order to donate them to a school fundraiser.  The theme was supposed to be 'candy' but I thought I'd donate these instead of adding to the heap of sugar already in the raffle basket.


I made eight total, four for school and four for home to replace some decrepit ones we're using now.  The four for school got cute sayings stamped on them.  I rubber stamped the letters onto pre-made bias tape with permanent ink and then heat set it before stitching it onto the bag.


(Get it?  Owl fabric - whooooo's hungry?) 


They are 100% cotton, high quality quilt shop stuff.  I would have preferred to line them in oilcloth or something water resistant but I didn't have any and the date of the fundraiser was fast approaching.  I'll make another batch for home with oilcloth innards when I get around to it.  I have a previous batch we've been using for years - they really are quite handy.

Wednesday, May 7, 2014

Grey and Pink Dress for Me

This dress.   Love it, love it, love it.


Looking at it one way, this dress was made in approximately one month.  In another way, I've been at this dress for over a year.   I started learning to draft clothing patterns over a year ago because I wanted to be able to make myself church clothes that actually fit.

I can finally say I've accomplished that goal because this dress:

1) is made entirely from scratch, pattern and all

2) it fits well (and is, therefore, very comfortable to wear)

3) its church clothes - even a full dress (not a cop-out skirt and top combo) and

4) its properly constructed (meaning all the proper parts are there and are sewn together in the right order with proper technique - not the case for my Beginner Dress of summer 2013).

My inspiration was two dresses on Pinterest - I took parts of these two dresses that I liked and mashed them together into one dress.


There were a few mistakes or wrong turns along the way.   Most of them I was able to fix on my own - the only remaining weird thing is this totally unnecessary seam all the way down the center back.  I changed my mind on the center back zipper halfway through the process, but couldn't recut all the pieces.  Only someone who sews would notice that its a nonfunctional seam (and not all that decorative) so it could have been removed.  


I put an invisible zipper in the side seam instead (from under my left arm in the photo below to just below my hip).  That lead to an interesting conversation with Grace - she was baffled because she couldn't see the zipper when it was finished.  

"Mom, I can't see the zipper." 
"I know.  That's why its called an invisible zipper, Grace."  
"Yeah, Mom, but it wasn't invisible when you were sewing it in there. I saw it then." :)

I guess Moms-who-sew can do some pretty cool magic and make things invisible.  :)  


Final analysis: 

Some things I'd change about the dress: 
1.  The fabric is just a tad stiff/bulky.  I got it at Mill End years ago because I liked the classy grey color/weave.  I have no idea what the content is - my guess is a polyester mix.
2. I flat-lined the bodice in muslin and that turned out to be unnecessary and contributed to bulk. 
3.  I'd get rid of that center back seam. 

Things I love about it: 
1.  Color
2.  Fit in general, but I love the color-blocked waist especially.  Its drafted from scratch and came together like a dream.  It actually sit at my true waist, which no ready-to-wear dress has ever done.  
3. Pretty proud of the armscyes and sleeves from scratch.  A few years ago I was terrified of sleeves on commercial patterns and never would have thought I could draft my own.  They can still use a little tweaking...
4.  Love the bias cut skirt.
5.  Love the fact that I understood what I was doing as I was making it!  

The best part is I now have a master pattern for myself so I can now go to town making church dresses by just tweaking little things here and there.  Subsequent dresses should come together smoothly and fit great!  


Sunday, May 4, 2014

Reupholster kindergarten couch

Here is a different type of project.  Word is apparently getting around the girl's school that I sew, and a teacher asked if I could fix a dilapidated pint-sized couch.  I said I would give it a shot.

Here is what it looked like BEFORE:


It was covered with quilting cotton fabric (the frogs, which the girls thought was totally disgusting) and then some other scrap of blue that was tucked in to cover the foam on the seat.  The foam on the arm was exposed and getting picked at by little kids.  Ew.

Here is the AFTER photo:


Much better, right?  

It turned out to be easier to take off the old cover entirely and recover the original foam/wood so it was more of a hot glue and staple gun project than a sewing project.  We picked out some heavy duty canvas from the clearance racks at Hancock so it would be a bit sturdier than the previous quilting cotton cover.  Lots of staple removing, dusty corner cleaning (think kindergarten dirt), cutting of fabric rectangles, and then stapling back on.  I can't say I feel the need to do much more upholstery work, but I was happy to help out the teacher and keep the kiddos from picking at foam.  

Okay, quick -  put the staple gun back in the garage and get back to needle and thread!  :)  

Wednesday, March 26, 2014

New Bag for Myself


I've been using this bag all year for my bible study books/papers and really enjoying it.  Having a pretty bag just makes me smile.  Compliments from strangers doesn't hurt either.  :)

My drawstring backpack that I carry as a purse has been used to death and seen better days so I decided it was time for a new everyday bag/purse for myself.   I spent a few evenings drawing and planning, a week-ish sewing off and on, and here it is!


I found the teal and brown geometric print at Hobby Lobby.  Its a duck cloth/canvas, although not super sturdy.  In hindsight I should have experimented around with interfacings because it could be just a tad stiffer.  

I love piping, so this bag got a generous dose of nice brown piping - all around the base and sides and top of the bag, as well as both sides of the strap.   A cute little pleat in the middle adds just a tiny bit of shaping and adds a few cuteness points.  


I spent a long time looking locally for slide buckles so that the strap could be adjustable.  It was ridiculous - between all the craft and sewing stores we have around here I could not make one single set of hardware for this bag in all the correct sizes and all the correct materials.  Either I could match sizes or I could match metals (silver, gold, pewter, etc) but not both.   I guess I learned my lesson and next time I'll buy the hardware online first before making the bag.  

I ended up with nice bars on the sides, just no slider for adjustability.  As is, its a long shoulder strap - not quite cross body.  (Come to think of it, it might work for cross body once summer comes and we can shed the layers of clothing and puffy jackets.  Its working okay as a long shoulder strap so I'm happy either way.)  I worked very hard to get a totally reversible strap with piping.  Not that anyone else will notice, but it was a fun mental exercise to make it work without any exposed ends.  


The lining is a fun brown on brown checkerboard print and I added a cute curvy elasticized pocket custom sized for my phone.   I also added a magnetic snap.  I've never used those before but it was super simple to insert.  I could see those becoming kind of addicting.  :)  


I've been using it for a few weeks now and I really like it.  The best part is that I actually physically measured the stuff I keep in my purse on a regular basis and made this to match so its JUST the right size.  Not too big, not too small.  Love, love, love that about it.  It was also good sewing practice with piping, straps, structure, layers, etc so I feel like this bag is good but my next one can be really great because the sewing technique will be that much better/smoother.  


Yeah for a new bag...  I should do it more often!  :)  


Tuesday, March 25, 2014

Mermaids

I have had visions of mermaid dolls floating around in my head for quite some time and they have finally come alive in fabric.

I have made three mermaids in the last few months and I think each one is better than the last.  I started by sketching a mermaid one night after trolling for ideas on Pinterest.  It took a few tried to get the 3-D mermaid softie toy to look like my 2-D sketch but I like how it has progressed with each doll.  Tweak this seam a bit here, add a little width here, take out a little width there, throw in a little football-shaped dart in this spot to make it lay nicer, etc.

Here is the first one, which was gifted to a friend's two year old daughter:


Theses are the most recent batch:  

Blondie is version 2.0 and the Red Head is 2.1.  I like the tail shape of the purple one the best - I think the others are a bit too pudgy.  Mermaids are supposed to be sleek and slim, right?   


 Leah requested that her mermaid have 'red hair that is long enough to braid' and was thrilled with the results.   We call Blondie's flippy ponytail a 'do-wop'.  


They have embroidered faces and fleece hair.  The rest is made from quilting cotton.  I found the perfect scaly-looking print for the tails at Hancock.  


Leah declared hers to be an adventurous mermaid who wanted to explore and needed a bag to keep things in.  Within ten minutes she had turned a scrap of red fleece into this stylish satchel.  :)


I have the fabric cut out and ready to sew for six more mermaids.   Our plan is to stitch them up and then deliver/donate them to the local Salvation Army shelter.  The kids there can have a little homemade softie and my girls can have the experience of physically handing something homemade to a child less fortunate.  Should be a win-win.  


More Doll Dresses...

It is time to catch up on posting my sewing projects...

The first projects to report on are two quick doll dresses.  I didn't officially open up the Doll Clothes Factory, I just whipped up these two on request to match the girl's easter dresses.  The patterns are from Nancy's book and they stitched up very nicely as usual.

Pink eyelet for Samantha:  
 (funny how human-scaled eyelet looks more like swiss cheese on a doll-size dress)  


Gold for Molly: