Welcome to Anne's sewing blog!

I started this blog in 2012 in an attempt to keep better track of all the little things I make. I have found it fun to 'catalog' what I make so I'll continue to post my finished projects as they appear.

Its mostly for my personal use, but also gives me a way to share cute stuff with my craft-oriented friends and family. Enjoy!

Thursday, May 14, 2015

Grey and Teal Hexagon Quilt with Coordinating Throw Pillows

This one is a BIG finish that I am really happy to be able to share.  


My youngest sister got married last weekend and this was her wedding gift.  She asked for a couch-sized quilt with the caveat that her fiance is 6'3'' so it had to be long enough to cover his whole length.  Having made a quilt for my husband who is 6'2'' that was no problem.  :)  

The wedding colors were dark grey/black and a very pretty dark teal color.  I went with those colors and then expanded the teal to include other shades of teal and blue, plus added light grey and white.  


I made the pattern myself after browsing online for modern hexagon quilts.  My design is, I feel, a combination of this, this, and this.  I tried to incorporate the interesting use of 'negative space' between the hexagons - keeping them separated by about 1/4'' rather than right up next to each other.  It is random in the sense that it is an unplanned splash of colors, but organized in the sense that it looks like someone took a paintbrush and made a swish/stroke of color along the plain background.  I am usually a traditionalist when it comes to quilt patterns but I really really like this one!  Just modern enough, clean and simple, yet pretty.   The color palette has a lot to do with it and I have the bride to thank for that!

The background is a solid Kona dark grey (there is one long seam down the middle but its practically invisible underneath the hexagons).  The hexagons are a mixture of solids and small prints.  They are all appliqued on by hand.  I love hand applique and haven't done any major hand projects lately so I really enjoyed doing that part of it.  


The back of the quilt is a nice light grey and light teal print and the binding is a grey-on-grey small circle print. 


After much, much, much internal debate and gathering of opinions of family and friends I decided to have this quilt professionally quilted.  I have never done that before but I think it was the right choice for this quilt.  The interlocking swirly pattern looks fabulous and is way beyond my machine quilting skills.  The quilt will be really sturdy, it will hold up well to washings and cat hair, and having it quilted at our local quilt shop gave me the sewing time to make three dresses for the wedding (more on those later).  I will admit, though, that I'm itching for a hand quilting project this summer or fall...  

All my quilts get my initials and the year on them.  
(Not a bad mitered corner there as well, if I do say so myself...)  :)


Then, I added two throw pillows to the gift.  They are 18'' pillows and made mostly from scraps leftover from making the quilt itself (I ended up having to buy more yardage for the pillow backs).  Again, simple and clean, leaning-towards-modern in design.  Coordinating but not matchy-matchy.  I made these patterns up as well from the scrap sizes I had left.  


The newlywed's couch should be pretty snuggly!  
It will also work as a bed quilt if they want it to - it fit nicely on top of our queen mattress so it can do double duty.   Due to visiting the other side of the family I was not able to be there for the gift opening big reveal but I've heard they loved it.  


Wednesday, May 13, 2015

Camper Themed Tote Bag

This personalized tote bag went to my mom for Mothers Day.  


No, her name is not Ursula.  :)  My parents like to name their inanimate objects like cars, computers, etc and their pull behind camper's name is Ursula.  

It is made from sturdy denim and lined in cotton so its nice and durable for use in the camper.  


I traced the camper motif from an online coloring page and hand embroidered it in yellow floss.  These pictures got a little washed out but the yellow floss looks nice on the dark blue denim. 


Mom liked it and I'm sure it will get lots of use toting things around campgrounds.  

Wednesday, May 6, 2015

Fabric Water Bottle Carriers

I have been sewing my brains out during all of April and will try and catch up on blogging it all in May.

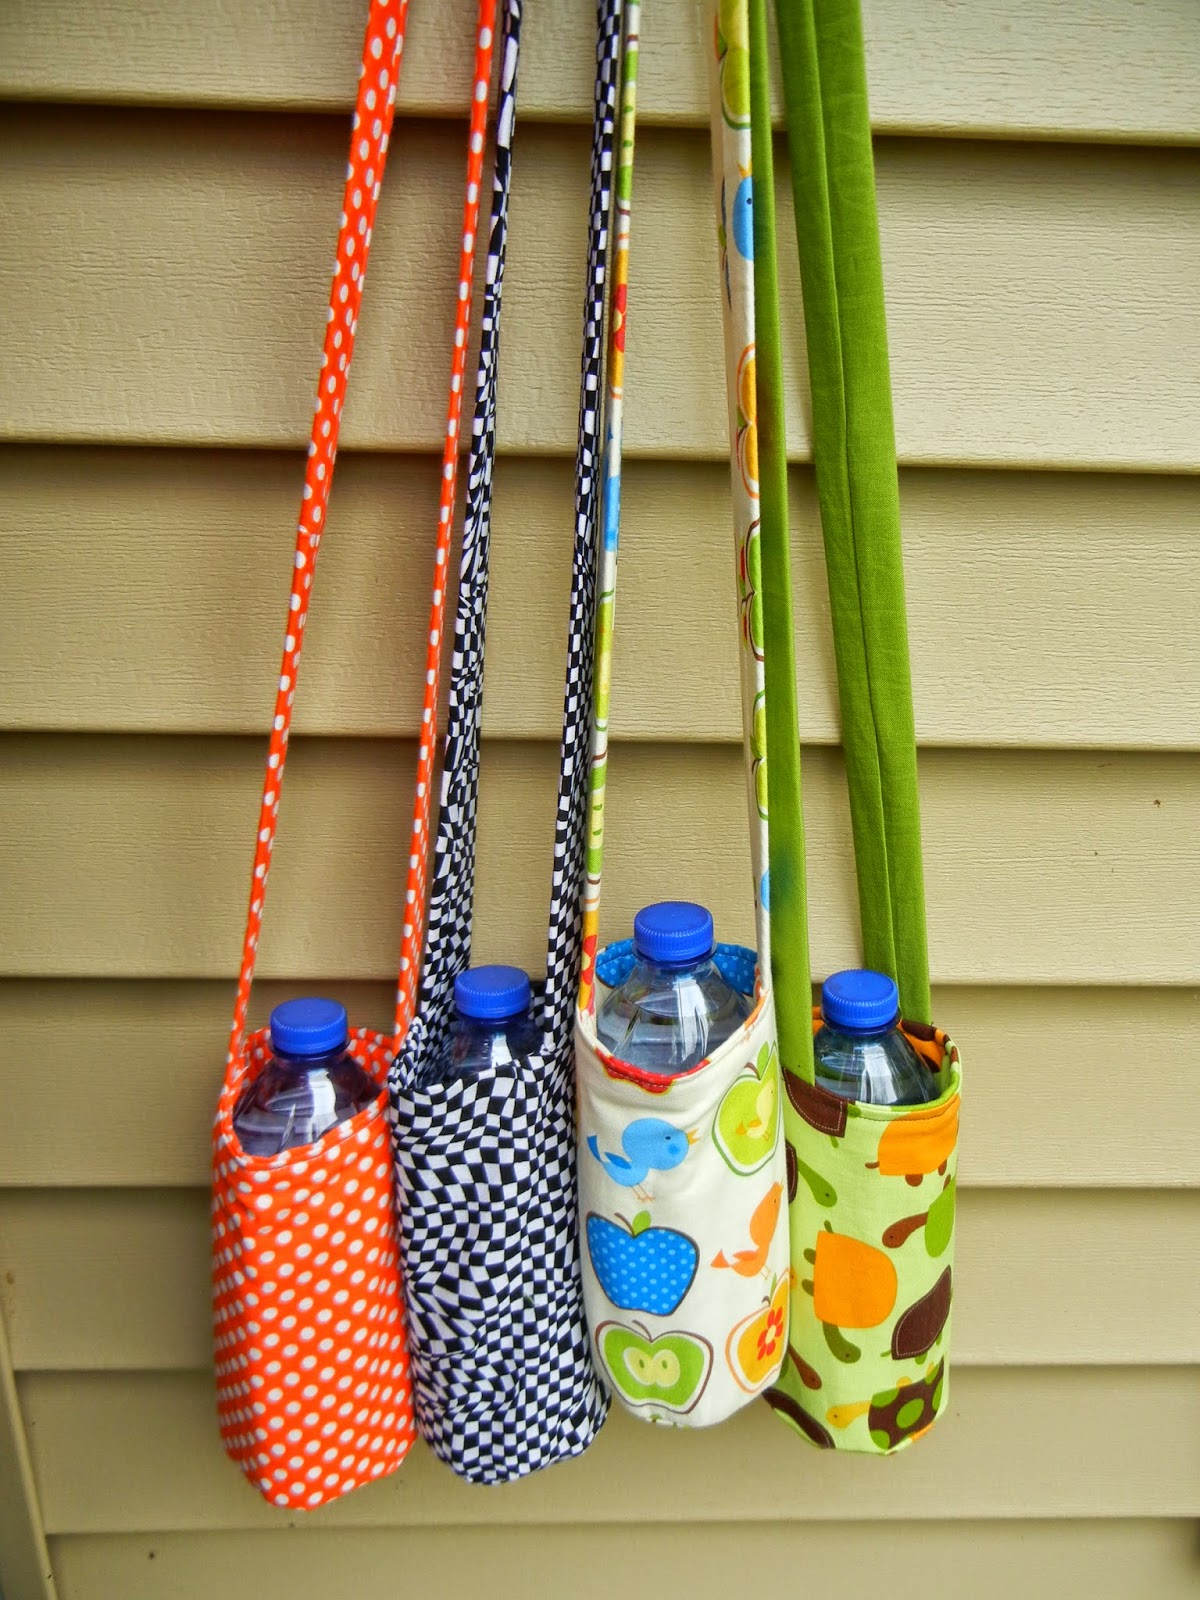
First up we have some fabric water bottle carriers.  These will be donated to my kid's school later this week to be raffled off as part of a PTO fundraiser.  They'll be in themed baskets.  One kid's theme is 'Summer Outdoor Fun' and the other kid's theme is 'Travel'.  I thought water bottle carriers fit both themes nicely and, to be totally honest, I wanted to practice and work out the measurements before making some for us to use around town this summer.


Since they will be for kids/families I took the opportunity to use up some of my bright novelty fabric.  I don't do much with brights so they've just been sitting there in my stash for a long time -orange polka dots, black racing flag, apples/birds, and turtles.  I'm happy to see the fabric put to use in a fun way.

Each carrier is made from a fat quarter or less of fabric, a rectangle of batting, and one yard of nylon web strapping.   The straps are my favorite (self-named) Strong Strap - 1'' nylon webbing covered in a tube of cotton to match the bag.  I slipped the straps in between the layers so everything is enclosed.  I made these with a 36'' nonadjustable strap that will fit kids, either over the shoulder or cross body if they're on the smaller end of elementary school.  The photo above is on a tall first grader.


The carrier is essentially a quilted tube with straps at the top and a circular bottom.  I used a french seam for the side seam so that there aren't any exposed edges visible from the top.  


The bottom of the bag is serged, as well as the circular base piece.  I stitched those two serged edges together and then serged that circular seam again so its nice and sturdy and all enclosed in serging.


For the raffle they'll hold disposable water bottles, but they are sized to hold adult sized Camelbaks. 


As I said, these four will be raffled off at our elementary school. 
I do plan to make more for us at home and for those I hope to experiment with hardware to make longer and adjustable straps as well as maybe adding a little key fob or pocket.


Ready for a hike anyone?  

I mean, a hike where the kids carry their OWN water bottles instead of Mom being the pack mule?  :)  


Friday, March 27, 2015

Notebook Organizer

This project is another gift for a teacher.  I've had these notebook organizer plans floating around in my head for a while - it seems like everywhere I turn is another cute fabric-covered notebook that I want to copy/make.  I'm toying with the idea of using these as end-of-the-year teacher gifts this year.  I've done bags in the past and (especially since we have a repeat teacher this year) I'm thinking it might be time to shake it up and try something new.

One of the girls has had a great student teacher this year that's been with them longer than usual and whom my daughter has really taken a liking too.  Her time in the classroom is up soon so I wanted to make her a little something before she leaves.  The timing worked out well.  I needed a quick gift and I wanted to test out making a notebook organizer.  Student teacher and trial-by-fire project - they were meant for each other!  :)

I'm pleased with how it turned out.  


I pieced the front from scraps of a quilt with a little lace for fun.  

(The back is plain purple - I forgot to take a picture of that and it has already been gifted.)

It closes with a button and elastic loop on the right side.  


It opens to a 5'' by 8'' notepad on the right, a slot in the center for a pen, and two pockets on the left side.  


There is another pocket under the notepad as well.  

Actually, the notepad fits totally inside the pink pocket if you'd like it that way - I just thought it was fun to slide only the back cardboard part of the notepad into the pocket so the paper hangs out.  


I made up the pattern off the top of my head and the measurements of the notepad.

If I make it again, I'll tweak the shape of the tan polka dotted pocket so its a little larger/more secure.  
I'll also play around with different combinations of interfacings, battings, and stabilizers.  This one is cotton fabric, one layer of batting, and then I slid some stiff stabilizer into the two sides before stitching it closed.  It's some kind of handbag stabilizer I had laying around, almost like a template plastic.  It worked pretty well and the finished organizer was a nice blend of fabric/batting so it felt 'soft' but was still stiff enough to keep its shape and not get mashed up in a purse.    

This definitely has potential for teacher gifts and I think I just might need one myself - grocery lists can be pretty, can't they?  :)  


Thursday, March 26, 2015

Tote Bags (4)

Tote bags are my go-to gift for teachers at the end of the school year.  They are fun to personalize and, most importantly, a USEFUL gift for teachers.  One can only have so many apple dittys and/or wreaths made from crayons, right?  My girls have been at their current school for four years now so word is starting to spread that I sew and I have gotten a few commission sewing jobs here and there.

Recently, a teacher asked for some tote bags and I was happy to oblige.  She requested one for herself, one for each of her two kids, and then one for her classroom.


I sized/patterned these bags after another bag I made this same teacher and after my favorite tote bag.  Its roughly 16'' by 16'' with a boxed corner and a 28'' strap.  Very simple, but very functional.  They are large enough to carry around a wad of papers to grade or Sunday School teaching materials but not so large that things get lost in the depths of the bag.  

The teacher's personal bag is a fun grey swirly canvas (so it coordinates somewhat with her previous grey bag).  It is lined with canvas and has a layer of batting in between.  The straps on all these bags are sturdy nylon webbing covered in fabric.  This has become my favorite strap method because it makes a super sturdy strap that doesn't get all floppy with use but it still matches the bag.  


The bag for her daughter has a hand embroidered name on one side and a outside pocket on the other side.  I think the mom intends these bags to be used for carrying kid gear on trips.


Similar design for her son.  The two kid's bags are 100% cotton (outside, lining, and pocket) with one layer of batting.  


The classroom snack bag is embellished with fun felt letters.  I used double sided fusible web on the letters and then stitched them down for durability.  This bag is made from black sturdy canvas as it gets dragged (sometimes literally) back and forth to school each day by a different student.  I used up a piece of not-so-beautiful stripe I had laying around for the lining of this bag and I didn't cover the straps so they are plain white nylon webbing (the store was out of black nylon webbing and I was just a tad short on having enough canvas to cover them).   


Four fresh totes in roughly one week of home sewing time - not bad!
  
The next project is a another teacher-related thing... probably posted in a few days or so.  


Friday, March 6, 2015

Art Bag Misfire

Hmmm.... this bag.  I had such big dreams for this bag and then time got short and I ended up whipping it up in one day with so-so results.   I've never been a procrastinator and creating under pressure never goes well for me.

My dream bag was a super organized art supply carrying case for my nine year old.  It would be a portfolio style bag with a 'flap' on the side that would open like a book to reveal cool storage.  I envisioned all these custom pockets for her favorite gel pens, good pencils/erasers, fancy markers, clear vinyl with zippers so you could see what was in each pocket, fun hardware to close the 'flap' against the pocket/portfolio part, etc etc etc.

In the end she got a box tote, no cool flap, a regular pocket on one side and a subdivided pocket on the other.  I even topped it off by mis-measuring so the proportions are a bit off, the straps are too far apart, and it barely holds the sketchbook I bought for inside it.  Oh well.  You can't win them all.  Thankfully, I hadn't told her anything and she doesn't know about the dream bag inside my head so she was happy as a clam to receive this bag on her birthday.  I even made it in garish purple and yellow with owls - her current favorite motif.


Maybe someday I'll make the real dream bag.  For now I'll enjoy the fact that she loves this one and I won't shed any tears when this one gets dragged around outside and gets all dirty.  :)

Tuesday, March 3, 2015

Apron and Kitchen Towel Set


How cute is this apron?  


I know, thats pretty vain since I obviously made it, but I still think its adorable.  It is a gift for my sister's wedding shower this weekend along with some embellished towels.  I was at Hobby Lobby and loved the graphic black and white print and then stumbled across some cool ruffled ribbon to use for the straps/ties.  With ruffly ribbon for ties, the bottom of my standard apron pattern was screaming for a matching ruffle and I couldn't resist adding a little bling in the form of three sparkly buttons on the bib portion.   I have made this apron pattern before (here and here for sure) and it is easy and comes together nicely.  Each time I seem to embellish it differently and each time I think its nice.   It is very easy to adjust the size or shape to suit your needs (I had to make this one a bit skinnier to fit my ruffle.)  

Here are some close up photos of... 

the bib portion:  


the ruffly ribbon ties: 


the ruffle on the bottom:  


The apron is lined on the back in black so, technically, its reversible to plain black.


Along with this apron will be these kitchen towels, purchased and embellished with grey and black/white fabric strips.  The strips are cotton and I pre-washed both the cotton fabric and the towels so everything is properly preshrunk. 


There were three plain flour sack towels with these embellished ones, so nine towels total.