Welcome to Anne's sewing blog!

I started this blog in 2012 in an attempt to keep better track of all the little things I make. I have found it fun to 'catalog' what I make so I'll continue to post my finished projects as they appear.

Its mostly for my personal use, but also gives me a way to share cute stuff with my craft-oriented friends and family. Enjoy!

Friday, May 17, 2013

Teacher Bag Number One

Since finishing the big quilt, I've been busy working on end-of-the-year teacher gifts.  Happy to report I'm done with all three - and school isn't out for another few weeks!

The first one is for the leader of Grace's little church class.  Its like pre-preschool for a few hours once a week.  Grace went regularly this year as she enjoyed it, it made her feel like a 'big kid' going to school, and it gave me the opportunity to volunteer in Leah's first grade classroom without Grace tagging along.  The teacher is wonderful and so I thought she definitely deserved a gift.

I found this fabric at a local quilt store and knew it would be perfect for teacher bags.  I've been calling it a 'sophisticated alphabet'.  Its alphabet, but it doesn't have little animals or other juvenile things running all over it and its done in a nice rich color palate rather than primary colors.  I chose a linen-look-alike grey to keep it classy looking, and a little pop of red thrown in for fun.

Here is Bag Number 1:


The fabric was designed such that you could cut a panel that would include the whole alphabet.  I made that into the front of the bag and then designed around that.  Its big enough to hold paper, notebooks, binders, etc.  She's an organist and it could hold a healthy sized pile of music as well.  

I made it with just one strap for over the shoulder and was pleased with how it turned out.  
Love that linen-look.  I'll be going back for more of that fabric in other colors for other projects.  


Its lined with plain muslin and has a medium sized pocket.  


And here is the five year old modeling it for size reference.  
Just ignore the messy sewing room in the background.  :)  


Coming up next will be Bag Numbers 2 and 3.  
I'm posting them in the order I made them, but it also happens to be in increasing cool-ness.  I liked each bag better than the one before.  So, stay tuned for more fun bags!


Tuesday, April 16, 2013

Friend's Birthday Quilt

I am happy to share a big finished project today.  My quilt for my dear friend's birthday is all done and was delivered over the weekend (on her birthday, no less).

This project was 'born' two years ago when she turned 38.   I've sewn her small things over the last 7 years - little ditties/wallhangings when her babies were born for example, or I've mended things for her, but nothing major.  So when she turned 38 I told her, "You know what?  When you turn 40, I'm going to sew you a quilt.  A real, full size (vs baby sized), nicely done, just-for-you quilt."  She gladly accepted and that was that for about a year.  When she turned 39 it moved higher on the priority list.  I let her peruse through magazines to show me what she did/didn't like as far as patterns, styles, colors, etc and then give me some direction on fabrics she did/didn't like.

Her 'requests' were:

1. A traditional, classic pattern.  None of this currently popular modern/improv junk.

2.  A definite border to frame the quilt.

3.  Could I somehow incorporate things she likes into the quilt?  Like flower fabric to signify her love of gardening, something juvenile to represent her family, etc.  She wasn't sure exactly how that might come about, but I think I managed to get the general idea.  I did pick what I thought were her 'Top Two' things rather than branching out into gardening, cooking/canning, music, etc.  You'll see what I mean when you see the individually embroidered blocks.

And.... here is the quilt all finished!  


The pieced blocks are pieced on the machine.  I believe they are called NorthWind blocks. 

The white blocks are all hand embroidered.  I traced her kids' hands last summer when she wasn't looking so that part of the quilt was a super-fun surprise.  Thankfully her kids kept the secret.  :)  

Its hand quilted.  Soooo relaxing... its been a while since I've hand quilted a big one and it was very nice to work on.   The making of this quilt went fairly quickly - much shorter than the year I had planned (though that may have something to do with the fact that I didn't start on time).  I pieced the top in late fall through January and hand quilted it between late January and, um, last weekend.  


Here is the theme of the quilt, in the top center block:  


This is the bottom center block:  


And their four kids surround them:  

Meghan is their eldest.  


Hannah is Leah's age and they are good buddies.


Michael is a tad younger than Grace, and even though they are boy/girl they are buddies too because they are both at home right now while their big sisters are off at school.  


Henry is the two year old cutie pie.  


 This is the pieced block: 
I was really happy with how these turned out, which I wrote about in a previous post.
I'll definitely be using this block again in other projects.  


Here is a somewhat underwhelming picture of the back.  Its just a pretty gold-on-white paisley.  Nice and simple and I love how the hand stitching shows up on the back of quilt.  Most of it is in cream thread but some is in dark green to match the front.  


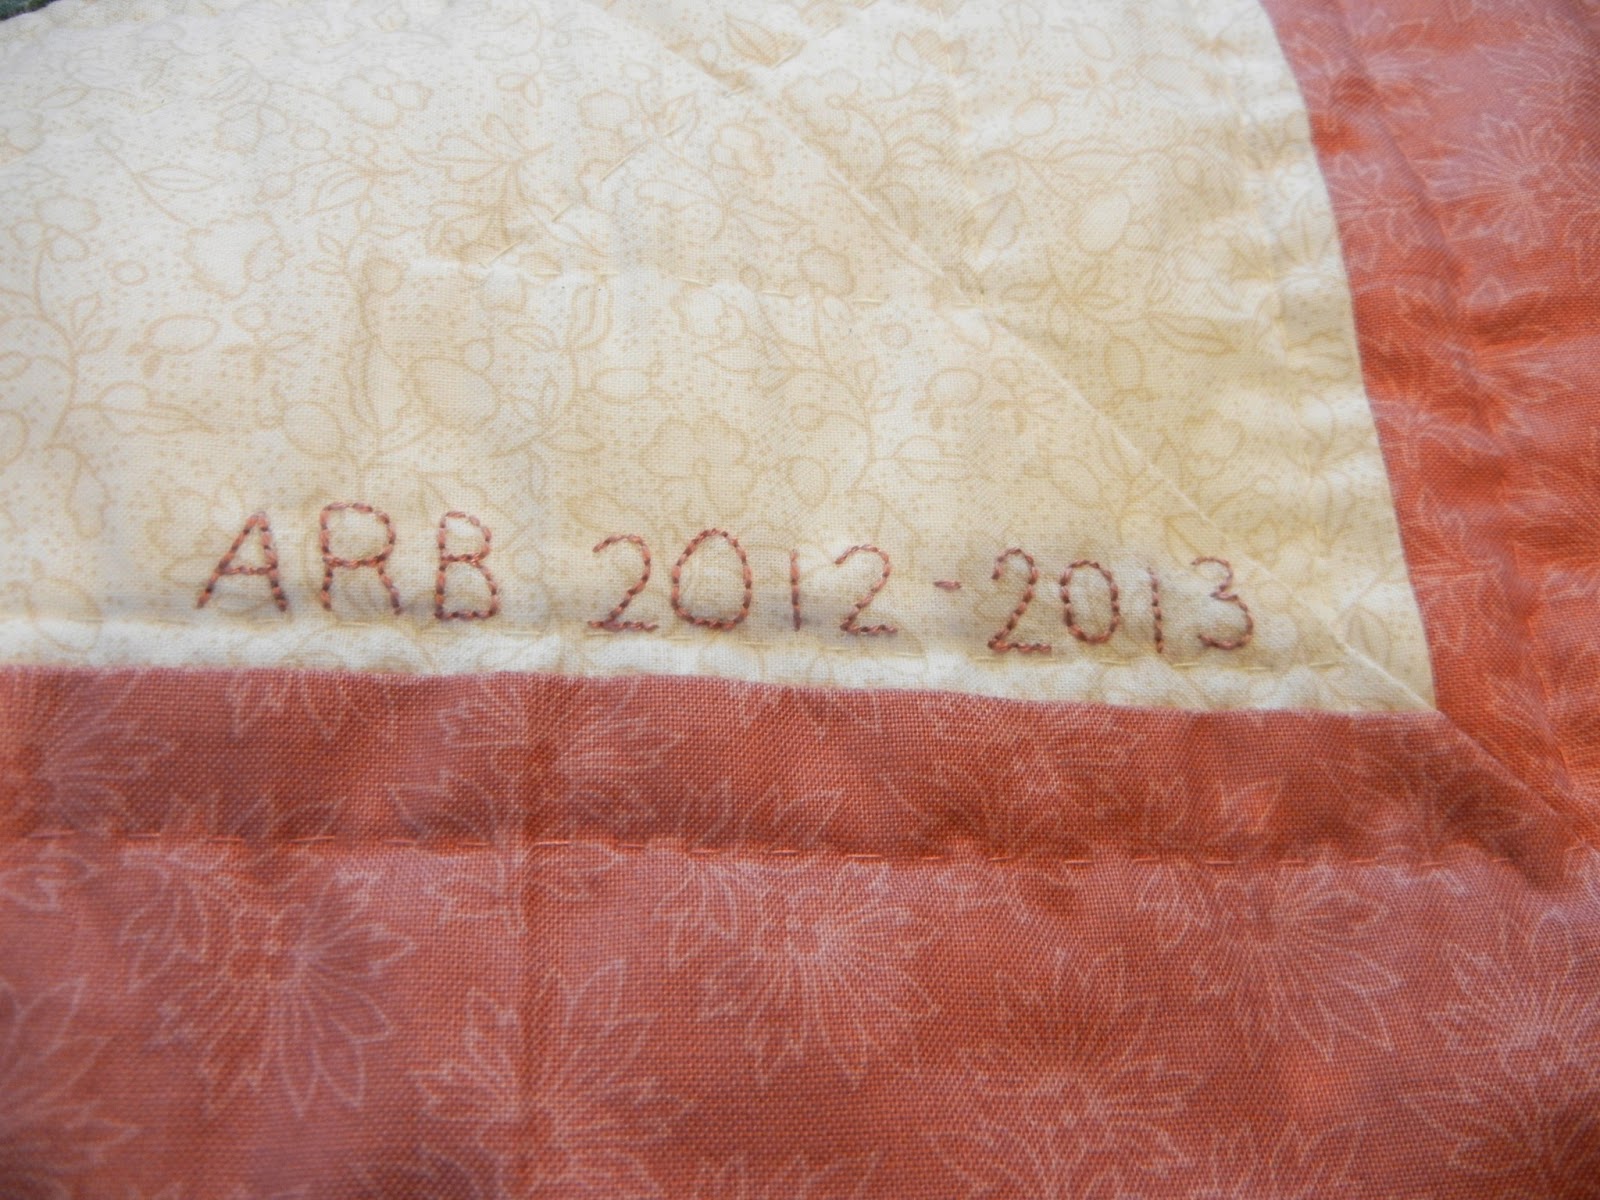
Every 'big' quilt gets my initials and the year I finish it.  This one happens to get the years I worked on it because the kids' ages on the front are their ages in fall of 2012 but I finished it in 2013 for the mom's birthday.  


This is where most of the quilting took place - on my great frame in my great sewing room.  Put my girls to bed, turn on the classical or the 'chick music' and quilt away - what a wonderful way to end the day.  


However, after it was off the frame I decided the embroidered blocks needed a bit more quilting.  They were puffier than the pieced blocks and it looked goofy.  So I used this cool old wooden quilt hoop that my grandma gave me to add some quilted hearts and scrolls around the hand prints.  It worked great and it was fun to quilt a bit upstairs after doing most of the work downstairs in the sewing room. 


So, there you have it!  

As with any project, there are little things I would change or tweak here and there, but overall I am happy with how the quilt turned out and my friend likes it too.  I knew she would.  


*******************************

With this giant project off my list I will take a little bit of time to sew some smaller, quicker things.  Some teacher gifts probably.  The girls are asking for 'boy dolls' to go with their girls dolls so that 'they girl dolls can get married to their princes'.  If it ever gets above 45 degrees this spring Leah will need some play skirts.  Quick things like that.  One of these months I need to work on making that sloper of myself so I can start on church dresses for myself.  The next major quilt will likely be to make a duvet-cover type thing for our biggest, warmest, snuggliest quilt but as that will hopefully be put away soon not to return till fall I can brainstorm on that one a little yet.  


Wednesday, April 3, 2013

Saving Faaaaaavorite Dresses

We've had many conversations like this one in our house lately:

Grace:  Hey Mom, look!  My favorite play-dress from last summer!

Mom:  Yes, thats nice honey, but look how short it is on you now.

Grace:  Its not too short, Mom.  See?  If I crouch down it covers my knees.

Mom:  Crouching doesn't count - look how high it goes when you stand straight or dance or twirl.

Grace:  But Mooooom, its my faaaaaaavorite.  It can't go in the Too Small Pile.  Puh-leeeease can I still wear it?


The thing is, Grace has grown 3 inches just since November.  So they are really really too short.

Mommy sewing skills to the rescue!  If you chop off a play-dress right underneath the armpits and then add a waistband it miraculously turns into a longer skirt.

Like this, see?

Before:  Faaaaaavorite twirly dress from last year


After:  Faaaaaavorite twirly skirt for this summer

(Side note: This photo makes the skirt look wonky and not straight, but its just the way its laying on the table - apparently I didn't straighten it before taking the picture. I assure you the hem/waistband are straight lines...)


Before and After (forgot to take a picture of the whole dress, but I bet you get the idea)


Before:  Way too short


After:  Just right for twirling


People often ask me if I save money by sewing my girl's clothes.  I always respond that its FAR more expensive to sew clothes from scratch than to buy them, (especially since I'm a garage sale, thrift store kind of girl) but that I certainly save money by KNOWING how to sew and mend.  Here is a great example.  Grace has a bunch of 'new' skirts for the summer that cost me nothing more than a couple of hours and the cost of fresh elastic.  Considering they are all hand-me-downs or thrifted to being with, have now been worn by two girls at their proper sizes and their getting a third season as skirts, I'd say thats pretty great!  

Sewing the binding on the big quilt.  So. Close. To. Being. Done.   


Monday, April 1, 2013

Superhero Capes... round two

I am steadily working, working, working away at that big hand-quilted quilt, but once in a while during a loooooooong project like that I need to take a break and quick make something.  Something that can be started and completed all in a day's time.  Or maybe two days, tops.

I made some superhero capes this past December for a gift exchange.  I liked them and therefore promised to make my girls some capes for their dress up box.  (They have some really old ones made out of ugly fabric that I made as an experiment - definitely time for an upgrade.)  The capes have been on my to-do list since December and this week they seemed like the perfect quickie-instant-gratification project to jump on.

So, here they are.  Leah picked blue and Grace chose pink.  The 'outside' is a stretchy crushed velour and the 'inside' is flannel.  Leah specifically asked for comfy fabric (vs sparkly or shiny) 'so that we can curl up in our capes and they'll be like blankets'.  As if we are short on blankets/quilts in this house.  :)


The shoulder parts/closures are drafted from the shoulder part of their slopers so they fit nicely.  They close with big velcro patches.  


In contrast to the ones I made at Christmas, I widened the pattern a little and used 60'' wide fabric so they could be really swishy/twirly.  It makes them a tad heavier though, so that should be taken into account with whatever fabric you use to make sure they don't pull down in the back and choke their little necks.  

The girls are very happy with them and have been whooshing around the house in them since the moment they were finished.  This was a nice project in that I made the Christmas ones first and got to tweak and improve the pattern for my girls.  Usually its the other way around - they get the prototypes and the other people get the improved versions.  So, thats a nice treat.  

The big quilt is almost finished and looks as though it might even be on time for the mid-April birthday deadline so that'll be posted in the coming weeks.  


Sunday, March 10, 2013

Triplet Birthday Dresses

Leah got a new playdress for her birthday, and her dolls got dresses to match.


The dress was drafted from scratch and I'm mostly pleased with it.  The main part was simple to do and turned out great.  This was my first whack at sleeves from scratch and they are so-so.  To the general observer they are perfectly fine and you'd never notice the imperfections.  However, the more I read about drafting, the more I analyze clothes for their fit in key places.  I have a few things I'd like to tweak on the sleeve for the next dress but its not too bad for a first try.  

I am happy to report, however, that these three dresses officially finish off that giant piece of pink knit fabric.  I got it at a thrift store - it was a twin-sized duvet cover in its previous life and I've gotten at least four dresses and two skirts out of it, plus scarves, doll dresses, and who knows how many scraps the girls have used for random things.  It was dirt cheap and great for experimenting, but I can't say I'm sad to see the end of it.  Time to move on to a different color/pattern.  :)  

I think the last few posts catch the blog up on what I've been sewing lately.  I'm still plugging away at hand quilting the big quilt and also have another batch of costumes for the theatre department to work on in the next few weeks.  After that it will be back to more playdresses for the girls.  They've both grown so much in the last year that last year's dresses/skirts show a bit too much leg, if you know what I mean.   Hopefully I'll also get around to drafting a sloper for myself.  

Happy sewing.  Is spring here yet?  


Friday, March 8, 2013

Doll Clothes Factory

Last week was Doll Clothes Factory at our house.  The girls were asking for new dresses for their dolls so I said we'd turn the sewing room into a doll clothes factory for one week and see what we could accomplish.

I started with this book, which I've had for some time.


Its very well done - flat construction techniques so you don't have to sew around itty bitty circles for armholes and such.  The only glitch was that they are all designed for 18'' dolls and our dolls are smaller than that.  'Dolly' is a softie that is only maybe 10'' and the homemade cloth dolls are more like 6''.  So I could apply the theory of the book but not really the patterns themselves.  It worked out well, though, because it gave me a chance to practice my drafting skills on a smaller scale.  I was able to practice drawing patterns and trying them on, tweaking them, trying them on again, etc and it was all on  little doll sizes rather than kid or adult sized pieces of fabric.

We'll start with a 'Dolly' Fashion Show.  

She received a: 

playdress...


a wedding dress...


and another playdress that is talked about at the bottom of this post.   


Then our Fashion Show will move on to the cloth homemade dolls, named "Julie" and "Nettie".  

Here is what they look like naked....


and dressed in their rags from before.  Ugly tunics with no finished edges, seams coming undone due to  slipshod quickie construction, etc.  These dresses were a ten minute job when we first made the dolls and they needed something to wear.  Who would have known it would take a year to make them 'real' clothes?!  Ironically, as soon as the better dresses were done these were not thrown away but became 'the rags that Cinderella wears when she's cleaning.'  Little imaginations are so great, aren't they?  :) 


So, now onto their custom-drafted 'real' dresses...


with one 'nightgown' of snuggly fleece.


They all close in the back with velcro - easy for kiddy fingers to put on by themselves.  


Then, we have 'Ann', a doll that Leah chose from GoodWill with a few Christmas gift dollars.  She just got this one 'nightgown' and will need more clothes in the future (she came in a good princess-y dress that is in good shape) but I didn't get around to drafting a pattern for her before time ran out and the Doll Clothes Factory had to close for the week.  The neckline is terrible on this one.  She's more like a Barbie shape than the other ones so it'll be a bit tricker.  Clothes for her can be my next quickie in-between project.  


Last, but certainly not least, Dolly and Nettie got matching dresses.  Dolly and Nettie are both Leah's dolls and for her birthday she got a playdress to match.  So they can be triplets.  :)  Leah loved it!  Leah's dress can be another post, but since these are dolls I'll put them here.  


Whew!  Thats not too bad for one week's work!  The sewing room was a total mess of scraps flying everywhere.  Paper scraps from drafting patterns and fabric scraps being turned into dresses.  It was fun to experiment with drafting, fun to make dresses (they sew up very quickly once you've got a pattern that works well), and they have already gotten lots of playtime use.   

As a bonus, I have paper patterns for future use.  


The next time the Doll Clothes Factory opens up we can get right to work!  


Thursday, March 7, 2013

Bridal Shower Gift

A cousin is getting married soon and although I was unable to attend her bridal shower, I did want to send a gift.  She registered for towels - nice and practical - but I thought I'd jazz them up a little.  Her wedding colors are navy blue and white, with just a splash of silver.  I bought nice navy towels and embellished them with a little white and silver ribbon.


Not too fancy, just a little personalized and fun!