Welcome to Anne's sewing blog!

I started this blog in 2012 in an attempt to keep better track of all the little things I make. I have found it fun to 'catalog' what I make so I'll continue to post my finished projects as they appear.

Its mostly for my personal use, but also gives me a way to share cute stuff with my craft-oriented friends and family. Enjoy!

Saturday, November 15, 2014

Frozen Elsa/Anna Reversible Pillowcase

Leah was invited to a 'Frozen' themed birthday party a few weeks ago.  As soon as those elementary school birthday party invitations come home, my first answer is always "We'll see."  Once we've confirmed that the date works and the party is a go, my second line is always, "Well, start thinking about what you'd like to make the birthday girl."  My rule for birthday party gifts is that we either 1) make homemade or 2) give craft supplies so that the birthday girl can do homemade.  No store-bought dolls, toys, not even books unless there is something homemade along with the book.  Those are Mommy's rules - take it or leave it.  :)

Leah already had her idea before she came home from school that day with the invitation in her hot little hand.  She knew it was a 'Frozen' themed party and that the birthday girl was completely Frozen-obsessed.  Leah wanted a pillowcase that was Elsa colors on one side and flipped over to be Anna colors on the other side.  Pretty creative, I have to admit.  The birthday girl probably had all the other Frozen merchandise available in stores but she likely wouldn't have a reversible homemade pillowcase.  

I took these pictures on a pink background and wish I wouldn't have because it washes out the Anna side, but they'll have to do because the pillowcase has already been gifted.

The Elsa side:


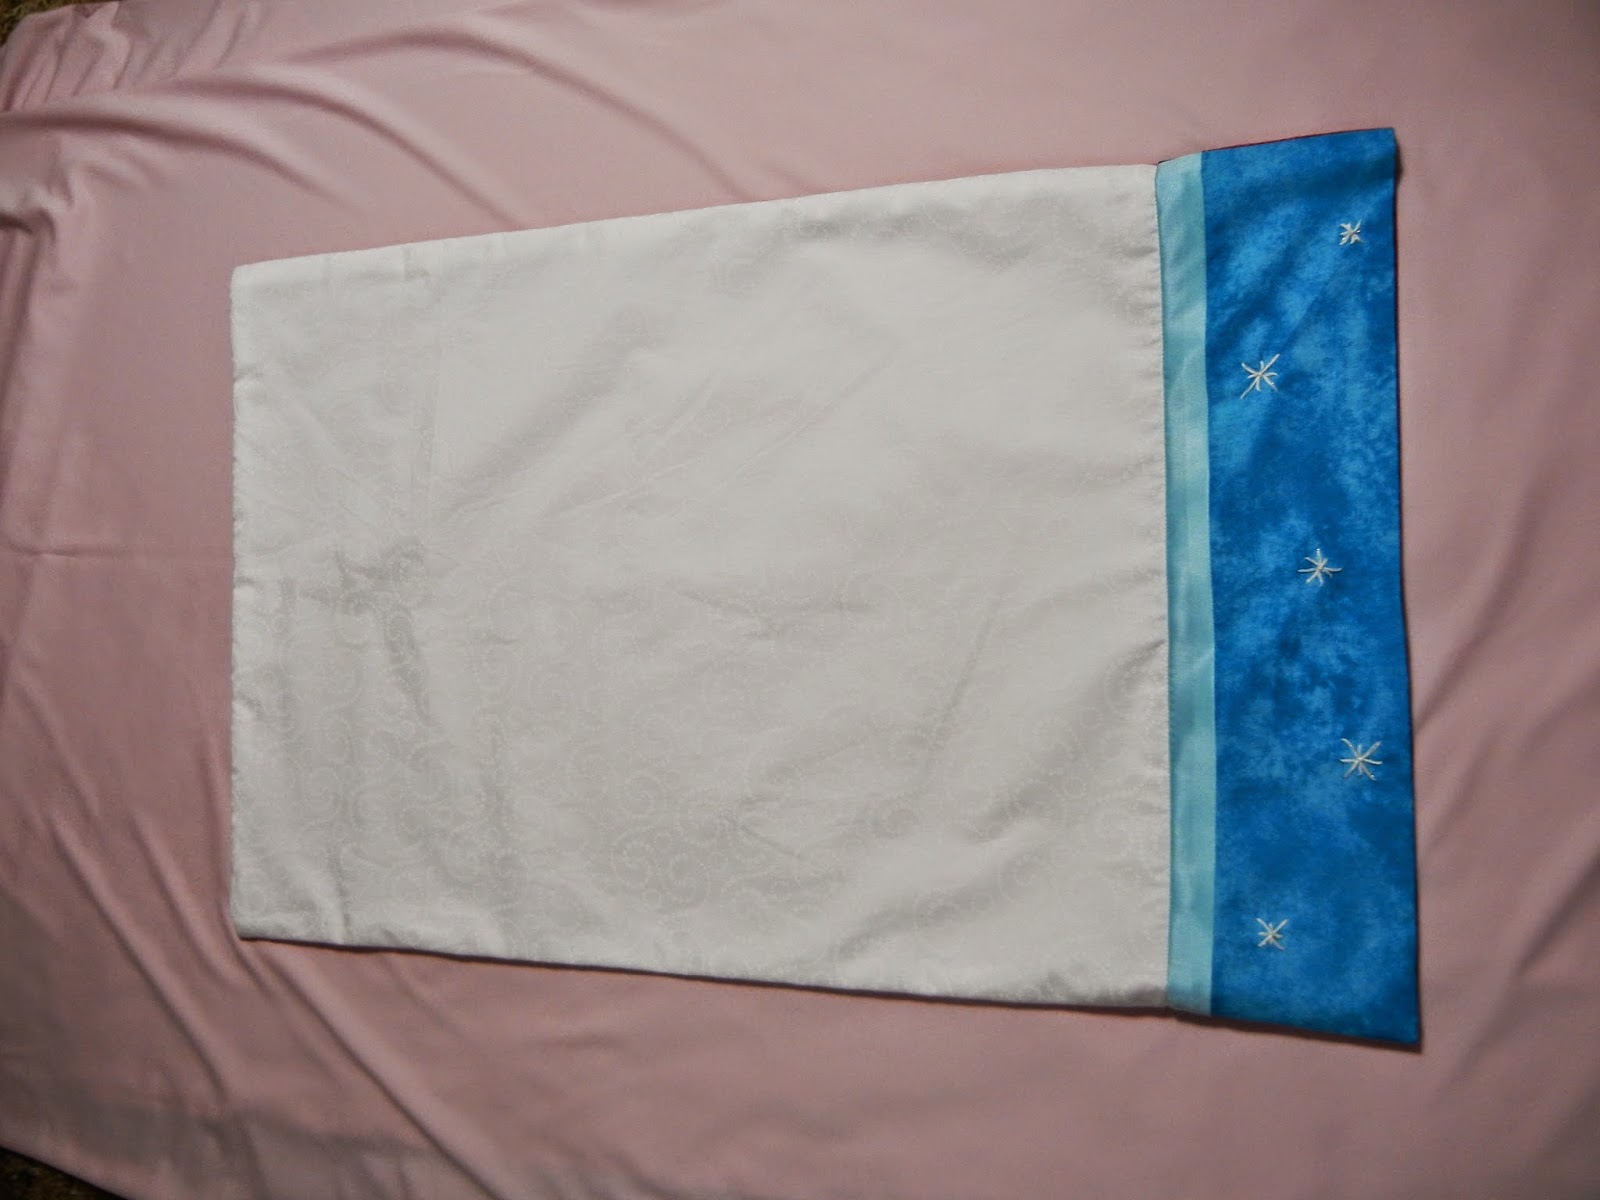
White on white swirly fabric for the snow, two different blues for the accent part, and a few snowflakes hand embroidered in white and silver thread.  


The Anna side: 


Light pink for the main part, dark pink and hunter green for the accents (taken from Anna's dress colors) and some gold embroidery very roughly taken from the details on her dress.


At first I thought Leah wanted the pillowcase to be reversible by having one princess on the 'outside' and the other princess on the 'inside' but Leah corrected me and said, "No, it has to be Elsa on one half and Anna on the other half, plain white on the inside because no one ever sees the inside of a pillowcase."  

Yes, ma' am.  Its your birthday present.  :)  


It ended up being a pretty quick sew for me because time was short.  I would have liked to do more to jazz it up, likely doing fancier appliques in place of the quick-and-dirty-not-the-best-stitching-job embroidery.   Then again, its for an eight year old that we've only known for a few months.  Sometimes quick jobs have to be done.  At first Leah wanted to help with the sewing but when time got tight she said she'd rather 'just have you make it, Mom'.  

The gift was very well received.  As it turns out, the birthday girl is learning to sew so she really appreciated that we sewed something for her.  Once again, hooray for handmade.  :)  

Ruffle Tunics/Dresses

These shirts/tunics/dresses for the girls are made from the leftover ruffle fabric from their Lego clothes.  


These are nothing fancy - just super simple tunic shapes reusing a pattern I have floating around from a previous year's dress bodice.  I lengthened the bodice shape to fit the scraps I had left over (without much flare because the ruffles).  They hit the girls somewhere between mid-thigh and above-the-knee.  Perfect for wearing to school with leggings.  They are lined with the same plain knit fabric as the Lego clothes.

I am happy to report that I am getting better at binding knits - these turned out pretty smooth.  I got a few wonky ruffles on the 'uphill' sewing side, but the binding itself is nice and soft and smooth.


The Sharpie 'x' is because Grace has serious trouble telling the front of her shirts from the back and I forgot to add a tag to this dress.  Many of her clothes have random Sharpie 'x's on their center backs.  :)

Tuesday, November 11, 2014

Christmas Stockings

One day, people.  One day is all it took to make these four Christmas stockings.   I've only been meaning to do so for...oh... about three years.  Sigh.


We currently have four mismatched stockings that I am not particularly fond of.  Every November I say I'm going to make new ones and every year it doesn't happen.  Two years ago I swore I'd get to it before the holidays to avoid the rush, but somehow it didn't happen.  This past January I VOWED to get them done.  I made them in August and embroidered the names in October.  Whew - deadline finally met!

I think there are lots of ugly or wonky stocking shapes out there - toes too long, sock part too droopy, too fat, etc.  When I saw a pattern with a shape I liked last year, I bought it.  They were impractically gigantic so I had to scale it down but that wasn't too tough.  I am pleased with the overall shape and pleased that they are all the exact same shape (our current ones are not and it drives me batty to see them hanging up there mismatched every year).


The cuff was nicely shaped in the pattern and with a little under-stitching (horray for knowledge gained at the costume shop) they stay nicely crisp and straight.  

The embroidery is by hand using a font I like on the computer as a template.  


I had a really hard time settling on a fabric/design.  Should they be pieced and quilty looking? Classic linen with hand embroidery? What kind of embroidery?  (Way too many secular and/or ugly embroidery patterns out there - will someone please design some simple, clean lined, nativity based patterns?!)  In the end, I went with simple but pretty Christmas fabric.  Hopefully they'll stand the test of time and not look cheesy in a few years.  I plan to make a table topper for a nearby end table with the fabric scraps and that should make for a nice coordinated living room.

So... I can finally cross that job off my 2014 To Sew List.  And while I'm at it I might as well cross it off the list for 2013 and 2012 too!  :)


Saturday, November 8, 2014

Halloween Costumes 2014 - Lego Friends Olivia and Stephanie

I made simple costumes/clothes for Halloween this year.  As a family we don't really celebrate Halloween but there is a Storybook Character Day at school so the girls ''need'' a costume for that day.  I stumbled upon an idea online (thank you) where someone painted shirts to look like the shirts the Lego Friends wear.  I nonchalantly asked the girls if they wanted to be Lego Friends for Halloween and they were immediately sold on the idea.  No surprise whatsoever.  :)

It wasn't until AFTER I had haphazardly suggested the idea that I realized how truly fabulous an idea it really was.  The costumes were incredibly simple to make and the millisecond they were home from school on Storybook Character Day the outfits went straight into their regular school clothes rotation.  Lego Friends wear ruffly skirts and t-shirts - regular clothes, not 'costumes'.  I love it when sewing turns out high-yield, often-worn items.

So, without further ado, here are Olivia and Stephanie.  I'll include a picture of the minifigures themselves just in case you are not up to speed on your Lego Friends characters.


This is Olivia, our eight year old's favorite character:  


And this is Stephanie, our six year old's favorite:  


The skirts were really easy to make.  I had been looking for an excuse to use this pre-ruffled fabric for quite some time and this was finally the perfect application.  I found it at Hobby Lobby but I think its available elsewhere as well.  The skirts are self-drafted but they are basically a rectangle with very slight tapering on the sides attached to an elastic casing waistband.  Easy peasy - I probably made both skirts in an hour or two.  The ruffly fabric is a bit of a trick to cut and sew, but not too terrible as long as you think ahead about where you want the ruffles to be.  I used 1/4 inch quilting tape (skinny masking tape) to tape the ruffles down along the seamlines.  That worked wonderfully for keeping the ruffles all pointed in the proper direction under the presser foot.  The skirts are lined with some knit from my stash because the ruffly fabric is pretty sheer.  That same lining knit was used for the waistband.  (As a side note, it was fascinating to me to find out that my girls have almost exactly the same size waist right now - the younger one is actually a tad bigger around.  The older girl is the same size around, just much taller.  I see much sharing of clothes in our future.)


The shirts are fabric appliques on store-bought shirts.  I used double sided fusible web to attach the shapes that I had drawn on paper.  I sketched the shapes for the fronts and then found a Lego Friends logo online to trace for the back of the shirts for an extra bit of fun.  I was pretty pleased with how they turned out and was even more pleased when I showed them to the girls and Leah blurted out,  "Mom!  They're... like... perfect!  How did you do it?!"   :)   I started out with the heaviest weight fusible web and that held up for Storybook Character Day, but ended up stitching around the appliques later to make sure they stayed through the wash.


The costumes were well received at school and the different pieces and parts have already been worn to school a few times.  I'd say Halloween 2014 was a total sewing success!


P.S.  I am also really thankful that I did NOT end up sewing intricate Elsa and Anna costumes like so many other poor crafty moms this year...  Just sayin'.  :)  


Friday, November 7, 2014

More Crochet Scarves

I made a few more crocheted scarves.  When things are busy at the costume shop and I sew for six hours in a day I don't really feel like sewing when I get home.  However, I still like a little crafty thing to keep my hands busy while watching TV, while the girls are playing happily, etc and crochet has been great for filling that need.

I am still learning about yarn and what kinds/styles/weights/colors I like to use.  Without a pressing project I thought it might be wise to crochet through my current stash to practice a bit and make some space for new yarn.

This first goofy scarf uses up yarn that I bought last year when I was brand brand new to crochet.   I think it looks kind of like a candy cane and wish it could have been just a bit longer, but since the point was to use up yarn I wasn't about to go out and buy more to make the scarf longer.

(The background for these pictures is light pink.  The first scarf is dark pink and white, the second scarf is plain white.)


I made a little tab on one end so the scarf can be wrapped around and tucked in... 


like so.  


It's soft and snuggly and will go in the general rotation for recess/outside play time.  Definitely a keep-you-warm-scarf and not a look-fashionable-outfit-scarf.  :)  Also, I carried the yarn between colors on this scarf thinking it would save me time weaving in tails at the end.  I wish I wouldn't have carried the colors because then I had to crochet the white around the edge to catch those carried threads and I think it would have looked nicer without that white on the edges.  Live and learn.  


This next scarf uses up the end of the white yarn from my shawl (which I am happy to say is getting lots of use - all three of us girls take turns wearing it to church each week).   I really like this thinner, silkier yarn, and I like the pattern I made up for the shawl so I used it again.   It ended up being a bit too short to use as a regular scarf (meaning, wrap around your neck a few times when worn with a coat) so I made it into a tube (twisting it one half turn before closing the tube) and I think it should work as a cowl/fashion scarf.  


Both these projects were fun to work on in the evening and now my yarn drawer has room for more. 
 I have two more partial balls to use up and I'm going to try a hat. 


Thursday, November 6, 2014

Quilted Pencil Case

Whew!  It's been a while since I've posted any projects.  I've been sewing quite a bit so I have plenty of things to share and I'll try and get caught up in the next week or so.

Many of them are smaller projects because work has started back up again at the costume shop.  I am so blessed to have a job that involves getting paid to do sewing and pattern drafting AND is so flexible that its still allows me to be a housewife and stay at home mom.  I'll do a post about costume shop projects eventually, but it will probably be one big post about a semester or year's worth of work rather than cataloging them one by one as I do with my home sewing/crocheting/crafting.

Back to speaking about smaller projects, I've been following this blogger for a while and bought her pencil case pattern months ago.  If you ever need girly, pink, frilly, lace, pastel cutesy inspiration - this blogger is your go-to-girl.  Last weekend I was looking for an instant-gratification kind of project and decided to give this pattern a whirl.  I need another pencil case/pouch/cute little bag like I need a hole in the head but I couldn't help it.  :)   This one will definitely get some mileage because it's just so darn adorable!


Things I love about it: 

1.  The bound zipper opening.  So slick and easy to do and it looks so polished.  I might just bind all my bag zipper openings from now on. 

2.  The 'handmade' label.  That was a freebie when I ordered the pattern.  The pattern author uses lots of labels on stuff and I like the look.  I think you can find them on Etsy. 

3.  I love the little tabs on the ends of the zipper.  Brilliant and cute put together.  

4.  The overall shape/size.  Who doesn't love another good bag template? 

Things I hope to do better on next time: 

1.  The circular ends were a bit putzy and didn't turn out perfectly circular.  That part needs practice. 

2.   I needed literally one more inch of the lace trim!  I wanted it to go straight to the ends of the bag but was just.a.bit.short.  So I had to fudge a little and taper it into the zipper bindings.  Oh well.  

I definitely plan to make this one again.  There are so many cute ways you can embellish it or change it up.   Thanks for a good pattern and it was fun to make something for myself.  :)  It's already in my purse holding lotion, carmex, kleenex, etc.