Welcome to Anne's sewing blog!

I started this blog in 2012 in an attempt to keep better track of all the little things I make. I have found it fun to 'catalog' what I make so I'll continue to post my finished projects as they appear.

Its mostly for my personal use, but also gives me a way to share cute stuff with my craft-oriented friends and family. Enjoy!

Monday, December 30, 2013

2013 Christmas Dresses

This year's Christmas dresses for the girls were a smash hit.  

The girls each chose their own colors and gave me design ideas/drawings.  I then drafted patterns from scratch and made the dresses.  I am happy to report that my custom drafts worked well and the dresses are great!  They are a huge improvement over last year's dresses in both design and construction.  Last year's designs were about as plain as you could get and had more sewing errors than I care to admit.  This years are a little more fancy/complicated in design and I can assure you are far more properly and professionally sewn.  

The pattern drafting (on paper) went fairly smoothly.  After a first fitting (made in cotton) I was able to see where things were going awry or didn't fit quite right, change the pattern on paper, do a second fitting and fix the problems.  One of my goals for 2013 was to learn more about pattern drafting and I feel like I have accomplished a lot in that regard.  I still have much to learn, but I have come a long way in just a year. 

Here is Grace's gold dress: 


It is gold satin, with a gold-on-gold satiny fabric as the trim.  
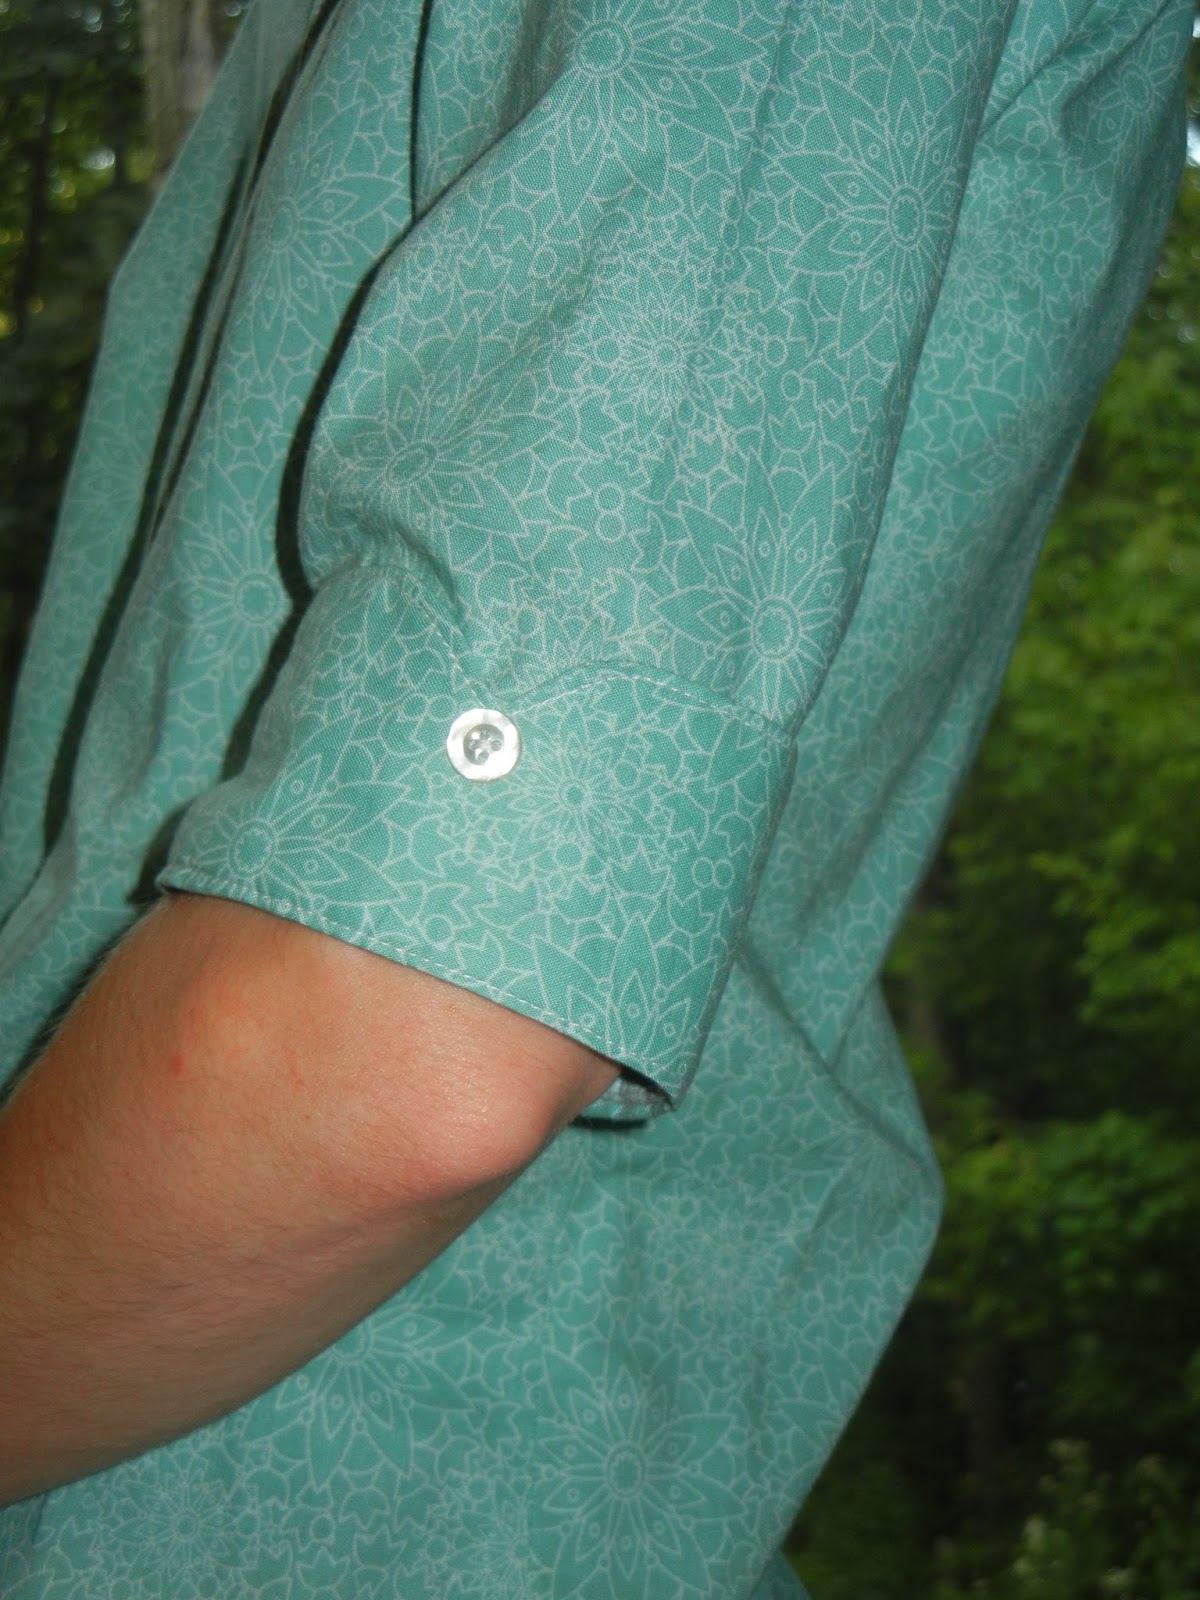
I trimmed/faced the neckline and cuffs with about a 2'' band and the waistline and hem with a wider 3-4'' band.

These photos unfortunately don't do the gold color justice.  The fabric and trim coordinate perfectly and are really gorgeous.  For better or for worse, Grace instantly looks older when she wears this dress.


The bodice is a pretty standard fitted bodice and the skirt is a gathered rectangle.  If I could do it all over again, I'd make the skirt a wedge-shape or a partial circle skirt but I'm okay with it this way.  Grace would prefer more twirl, but the fact that it is her favorite 'shiny gold' color makes up for the lack of a wide swishy twirl.  


The back is pretty plain.  Two small things to point out are the fact that I now know how to do a lapped zipper so the zipper is not exposed, and that I now know how to properly put the layers/trims together such that the trim looks nice and not like a bunchy mess (see last year's dresses for examples of exposed zippers and trims improperly applied...see, I'm learning!)  


One other small thing to point out about theses dresses is that they have sleeves.  That might not sound like a big deal, but I have a bit of a phobia with sleeves.  After a few too many improperly-eased-having-no-idea-what-I-was-doing sleeves in my past that turned out terrible, I gave up and have done mostly jumper style no-sleeve dresses for the last few years.  Now that I have good books to learn from, and have practiced a bunch, I find they are not so scary after all.  This year I decided beforehand that these dresses were going to have sleeves no matter what.  I even drafted them myself and they worked.  So, silly as it might sound, I am very proud of these sleeves and can say that my sleeve phobia is lessening as time goes by.  :)  

On to Leah's dress:  


I love this dress too because its different from others I've made.  Its not a standard fitted bodice (although its close), the skirt has a different shape to it, and it uses layers of fabric.  

  Its made from red satin and red lace.  The back photo shows the lace layer nicely.  The 'underdress' or the plain shiny red is red satin.  The 'jacket' part is red lace over a layer of red satin.   The dress looks different depending on how the light shines on the satin and lace and I like the effect.  The 'jacket'/overlay parts of the dress are piped in red to set them off a bit and add to the illusion of the 'jacket'.  


The bodice started with plain red satin, then I added the 'jacket' part and the waistline satin band with buckle.   The top (bodice) is actually all one piece - the 'jacket' is just layered and topstitched on.  So you can't lift away the top part of the 'jacket' the way you can the skirt overlay.   Leah and I both absolutely love the satin belt with a diamond buckle.  It adds just the right amount of bling to the front of the dress and Leah was admiring the buckle all through her Sunday School program.  :)


The skirt is two separate pieces.  One 'regular' underskirt of red satin and then the overskirt of satin and lace.  This young girl has gotten really tall and the design of the dress really emphasizes that.  Who said these girls could look so grown up so fast?!  Certainly not me.  :)  

These two dresses came together wonderfully and I'm sure they'll get lots of use all year long.  
Three cheers for custom fit, modest clothing for young girls!  

Tuesday, December 24, 2013

Crocheted Baby Blanket - Pink

Hello there!

It has been busy busy busy in the sewing room and now that it is close to Christmas I can start sharing what I've been working on.  This one is technically a baby gift, not a Christmas gift, but since the time frames are identical in this particular case this project was part of the pre-Christmas craftiness.

I continue to enjoy crochet and decided to try a bigger project.  Thus far I've only done scarves, small bags, etc so this baby-sized blanket is big in comparison.


I am happy with the way it turned out.  I wasn't sold on the asymmetrical stripe at first but now that its done I think it works.  Could be a tad wider, maybe?  Looking at the picture above it looks a bit off-kilter but it blocked pretty straight and square when I finished it.  I suppose I'll have to be more careful when I take pictures of crocheted things.

The main portion of the blanket is all double-crochet stitches.


I googled how to make the flowers at the end and am pleased with them.  I made about five and picked which ones looked the best.


The edges are done in a scallop stitch pattern (from a library book).  The 'sides' are great, the 'ends' are a bit wavy.  I'll have to work on that part a bit more next time.


Overall, its a snuggly soft gift for a little girl about to enter the world.


Notes to self:  
-Used medium weight (4) yarn and gold hook (have to look up size later)
- Used 15 oz and 750 yards total
-Finished blanket was 30'' x 37''


Monday, November 4, 2013

Sparkly Fairy Dresses

We usually ignore Halloween around here, but this year I decided to make the girls new dresses for the dress-up box that could also serve as costumes for the school parade.

They spent the summer obsessed with the Rainbow Magic Fairies series of books, so fairies seemed like a pretty safe bet.  I bought new fairy wings to replace our decrepit toddler-era ones and made these dresses without telling the girls anything.  What a fun surprise for them one day after school to have new dress up clothes!


I made simple bodices with full circle skirts.  The fabric is called 'confetti dot' (I think) and it has shimmery sparkly dots on a stretchy knit.  I fully lined the dress and skirt with a soft white knit so the dresses are very comfortable - no scratchy seams or itchy parts.   It was so stretchy and easy to sew I didn't even need a zipper or other closure - they are easy-on, easy off over the head.


I purposely made them a tad big so that they could wear warm layers underneath to school and they wouldn't outgrow them within a month or two.  Leah has outgrown just about everything in the dress-up bin so its wonderful for her to have something to wear that at least hits her knees.  


The full circle skirt gives them a pretty good twirl too!  

The dresses have already gotten tons of use.  Fairies, princesses, ballet dancers, and anything else that wears a sparkly dress - the girls have imagined it all.  

****************

I've also been working on a quilt.  I have the top finished and am now embroidering it but I forgot to take a picture before I started stitching so now it'll have to wait till the end.  Probably Christmas or someone's February birthday.  Picture 'pink' and 'cats' and you'll have a pretty good idea of what it looks like and whom its for.  :)  


Sunday, November 3, 2013

Flowery Tote Bag

Why is it that we quilters always make cute bags for others (here, here, here, and here, for example) and then we ourselves use 15 year old totes from Fashion Bug to carry our own stuff around?  I don't know the answer to that, but I always find myself admiring other people's cute tote bags and thinking "I could totally make that!"... but I never get around to it.

This week I had a day to myself with the housework completed by 10am.  I declared it a Sewing Room Day and got down to work on this.  I started around 10am and was done by 2pm.  Its a super simple rectangle with boxed corners - nothing fancy, but very versatile.  The flowery fabric is a thrifted bedsheet, the green is a scrap from my quilting stash, and I used a layer of batting and a layer of sturdy canvas on the inside so its very hefty.  The lining is more thrifted sheet and a cotton 'facing' on the top.


Now have a cute bag to carry around... should have done it months/years ago. 


Goodbye Fashion Bag bag...

More Crochet Practice...

I am having fun learning to crochet.  

After a few scarves, I have moved onto other things.

This is a little pencil case I whipped up to hold my pens/pencils/yellow highlighter when I go to bible study.  It seems as though I always have too many pens in my purse... until I really need one and there are none to be found.

Its made with variegated yarn, single crochet stitch, with a button and buttonhole.  It only took me an evening to make and has already been very handy.


After that, I came across crocheting in the round and made this market-style bag.  The pattern came from here on the internet (whose solid bright color is much cuter than mine - I don't have a yarn stash yet!).  Its made with the same variegated yarn and a much looser double-crochet-in-the-space stitch, which makes it very floppy/stretchy.  You're supposed to use it at the farmers market and it'll hold an gigantic amount of oranges or something because it'll just keep expanding.  


Unfortunately I can't say I've found it to be very practical yet.  You can't put anything too heavy in it or it just stretches really long and thin, and it could probably use a stretchy lining so smaller things don't fall out.  However, as you can see, its already been confiscated by the girls and is a good stuffed animal pouch, plus it taught me crocheting in the round as well as gave me practice increasing and decreasing stitches so I'm happy.


I already have some ideas for Christmas/baby gifts that might be crocheted rather than quilted/sewn this year.  While making the market bag I found myself toting around a little workbasket everywhere I went so I could 'do a quick round or two' while I waited for something...its very addicting!


Thursday, September 26, 2013

Gaudy Scarves

Remember this scarf?

Well, the girls wanted their own and I let them pick out the yarn.

Someday they'll grow out of gaudy pink and purple, right?  :)


And, yes, I did three scarves for two girls.  
'Cause I know one will always be wet, dirty, left in a school locker, etc...

UPDATE:  I have since learned that you're suppose to block knitting things.  I wondered why the scarves were so twirly...

Monday, September 16, 2013

I Sewed A Shirt...

I made a shirt.  From scratch.  AND its even fit to be worn outside the house.  :)


The front is pretty classic, the back has two nice long curvy darts (which is why it fits so nice and why I wear the original so often).  


If you'd have told me six months or a year ago that I could make a button-down fitted shirt I'd have said you were crazy.  However, after months of reading pattern drafting books and experimenting with little things here and there I have apparently gained some useful skills.

I used a rub-off technique to copy one of my favorite purchased button down shirts that I wear all the time.  The rub-off results in a paper pattern which you can then use to make another shirt.  The rub-off part went pretty smoothly and then I laid out all my sewing books and slowly made one piece at a time.  This was my first time actually sewing a collar, collar stand, cuffs, plackets, and real buttonholes that have to work.  :)  I have to say that everything went very well and nothing was all that difficult - maybe I was more mentally intimidated than I needed to be.  I even managed to set in two very nice fitted sleeves.  Wa-hoo!

Collar:


Sleeve Cuff:  
The original shirt was long sleeved but I made this one elbow-length and added a curvy detail and decorative button to the cuff.  


It didn't go absolutely perfectly - the buttonholes are a tad off center in their placket and the bottom hem is a tad curvier than the original due to a mistaken adjustment in the draft - but overall I am extremely pleased with it.  My first attempt at sewing 'real' clothes was a comedy of errors during the construction process so I was very happy when the construction of this shirt went so smoothly and I didn't need the seam ripper every other minute.  Since I wear the original shirt all the time this should be a handy addition to my closet.

Post Edited:  Can you find my error?  I found one after wearing it a few times.  Ladies shirts are supposed to button the other way around...right over left, not left over right.  Interestingly enough, the original shirt is also buttoned as a mans shirt (which explains why I didn't catch the error while sewing).  So, my favorite shirts from Ralph Lauren are either buttoned up wrong or they are actually a men's shirt.  I've had them for eons and I don't usually buy Ralph Lauren so I'm guessing they were a purchase at the Polo Outlet Store from a trip right after we were married.  I think the Outlet Store sells one-offs and rejects, so that would explain why the button placket is backwards.  Funny the things you discover later on....   Anyhow, I've learned my lesson to pay closer attention to button plackets and I don't think anyone but a seamstress would notice when I'm wearing it out and about!  :)

Next up will likely be a quilt project...

What?! Crochet?

The girls and I got bitten by a crochet bug a few weeks ago.  The girls stumbled upon my inherited crochet hooks in a drawer and asked what they were for.  I told them it was similar to knitting, found a video tutorial on the internet, and showed them how to do the starting chain stitch.  I figured the interest would last about ten minutes.  Boy, was I wrong!  Both girls got the hang of the chain stitch quickly, and were SO enthralled with how they could make a long chain in a matter of minutes that it became an obsession.  They each rummaged around and found a basket to hold their hooks and yarn.  I'd find them around the house, sitting on the couch or curled up in corners with their workbaskets, making looooooooong chains.  First everyone in the family got necklaces, then they moved on to their stuffed animals, and then they just made chains for fun.  Scraps of yarn were everywhere...

I started teaching Leah the single crochet stitch after a day or two.  She found that quite difficult and thats about where her interest waned.  I, however, kept practicing the single crochet, got the hang of it quickly, and started messing about with swatches.  Before I knew it the stitches were pretty even and nice looking.  A few days later I had this lovely scarf to show for it.


I have found the repetitive motion of crochet to be slightly addicting.  Once my scarf was half-way made the girls gave me their puppy-eyed look and then came the inevitable, "Mommy, will you make one for me too?"  I have Leah's done and will be starting Grace's soon.

Who knows where this little jaunt into crochet will lead.  Its not like I don't have enough sewing to keep me busy!  Its been a fun diversion, though, and gives me something to do to keep my hands busy in the evening while watching Masterpiece Mystery.  Keith also likes it because his grandmother did lots of crochet so he likes seeing me sit there with a hook and yarn.

Wednesday, September 4, 2013

Tablet Computer Bag

I am happy to show off this latest project - its a bag for a friend's tablet computer.  She has a tablet (a tad bigger than an iPad) and nothing to carry it in.   After finding one she liked on Pinterest, she e-mailed me the picture and said, "Do you think you could make something like this?"

I spent a few evenings turning the idea over in my head figuring out (1) what pieces I'd need and (2) what order they should be sewn together.  A little fun shopping for upholstery fabric and other cool things like straps and piping and I was ready to begin.  It came together really smoothly and turned out almost exactly like the picture in my head.  Yeah!  She loves it and is now toting it around campus.

Here is the finished bag, in a couple of different views.

This is the front:  


The fabric is a neat corduroy-type tan with a fun circle pattern.  The straps are purchased webbing.

The back:  


And a close-up of the cool piping.    


The front has a slot pocket the width of the bag with a wide piece of velcro for a closure.  
I had wanted to do a flap to close the pocket but all the layers of canvas and upholstery fabric and piping got to be a bit too thick so it ended up being a slot pocket.  


It closes with a zipper that goes around the corners of the bag for easy opening.  


The inside is a nice soft fleece fabric to protect the computer.   I quilted the fleece to canvas to keep things nice and sturdy and give the bag some stiffness.  


The trickiest part of the bag was deciding how to attach the outside to the lining.  There are many layers between canvas, fleece, piping, upholstery fabric and the zipper so I ended up putting bias binding around the edges of the lining and then hand tacking that to the outer portion of the bag.  It worked great.  Both the inside and the outside are properly finished (no exposed seams) and everything stayed nice and tidy (even around the zipper ends).  


Here are a few pictures with our MacBook Air (11''?) for size reference.  My friends tablet is a bit smaller than the MacBook so there will be plenty of room for a book or two or an accessory keyboard if she needs to carry one of those.  


It was fun to make and very satisfying to make from scratch.  Sometimes when you sketch an idea and try to sew it things get crazy and don't turn out, so it was great to be able to visualize it and then sew it up and have it turn out so well.